Manage Domains on Siteglide
You can only manage custom domains on a Live Production Site on Siteglide, if you see the Go Live tab and not the Domains tab then the site is not Live. Please follow the Go Live steps: Go Live
You can either Fully Delegate your DNS to Siteglide or manage it externally:
With the increasing challenges faced with spam there are now stricter rules for email deliverability but there are some simple steps you can take to ensure your emails hit the inbox:
We strongly recommend Fully Delegating your domain for best results and to avoid additional steps redirecting the non-www to www.
If you have a domain that is managed in GoDaddy or another registrar and would like to point it to a Siteglide website you can use our External Domain feature. This means that you can continue to manage your DNS through GoDaddy/other registrar.
Navigate to the Domains tab on the Site and click Add Domain:
Type in the root domain without www and you'll likely want to set it as the Default Domain and Enable WWW Redirect. Then click Add Domain:
Important Note: Your domain can take up to a few minutes to be fully added to the system. Please check back and refresh the page shortly.
Once your domain has finished creating in the system, it's status will change to "Ownership Verification Pending" which means it is now ready.
Add the generated CNAME record to in your DNS control panel to verify ownership, generate an SSL certificate and automatically apply it to your site during the next step.
Once you have saved the record in your registrar, allow some time for propagation, check back and refresh the page.
Important Note: The CNAME verification record must NOT be deleted at any point otherwise the SSL certificate will not renew.
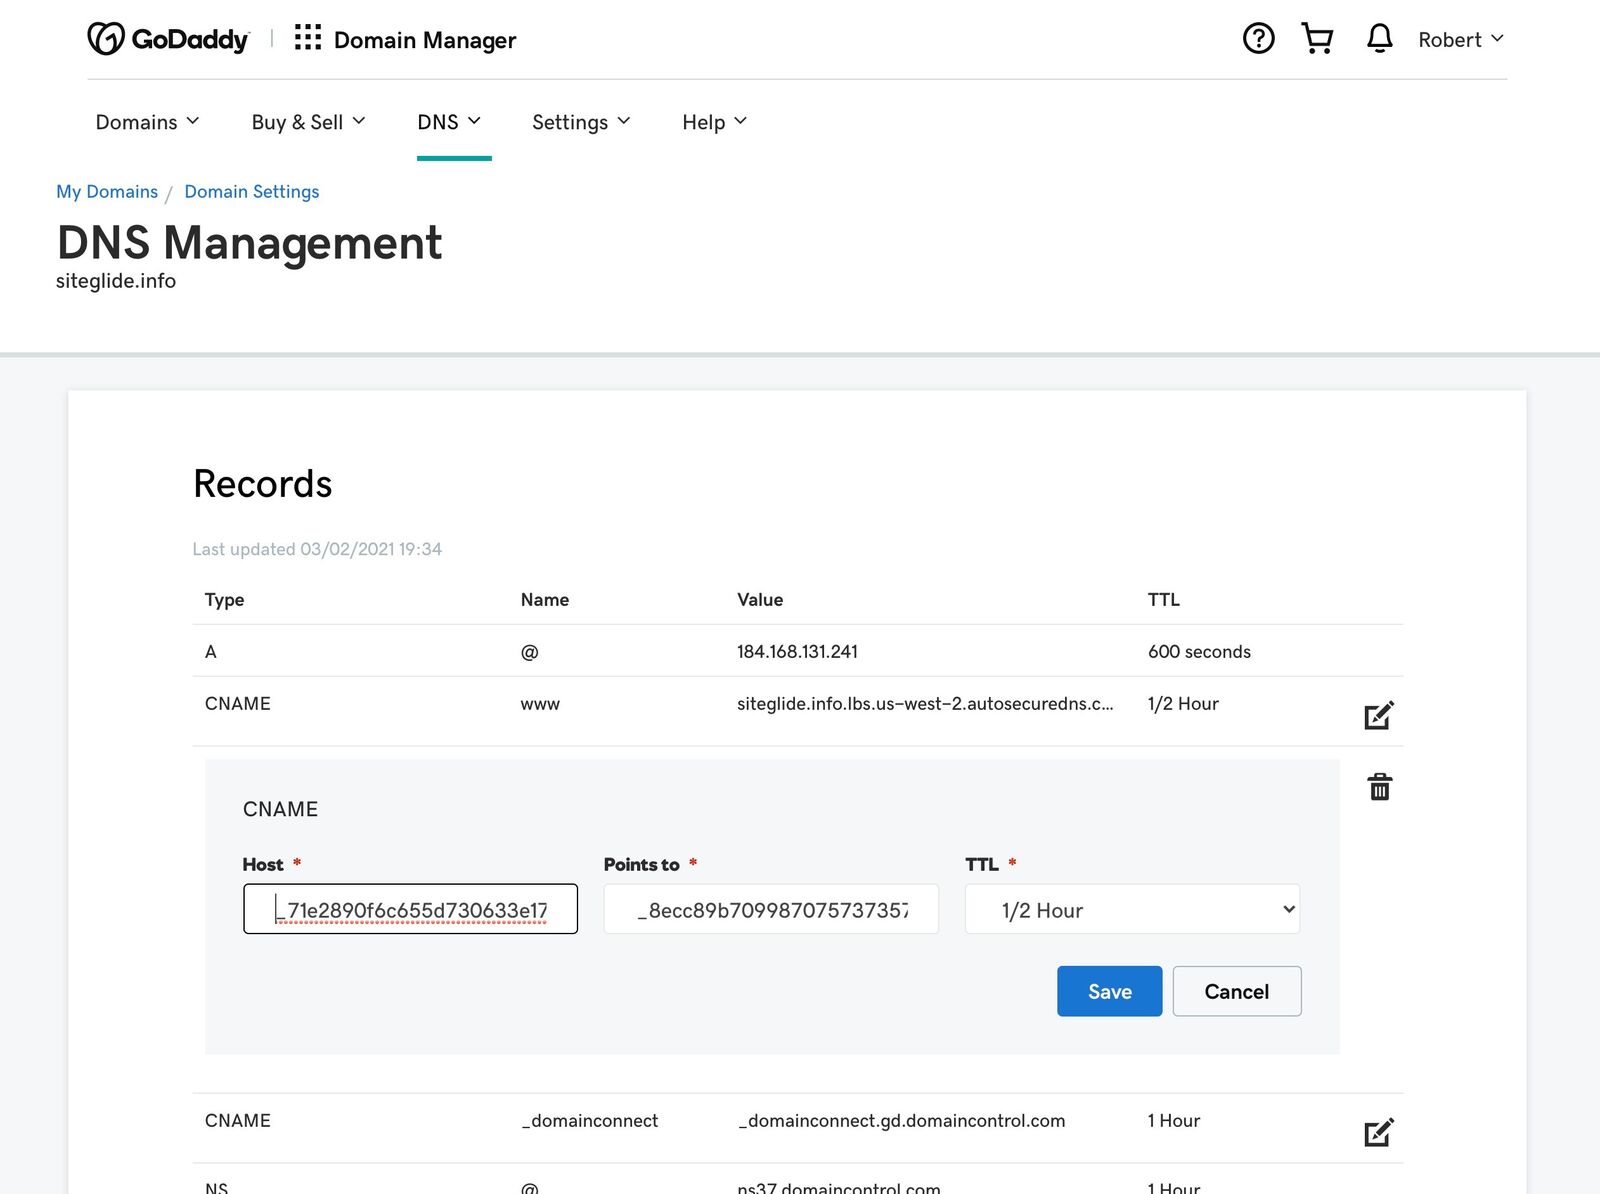
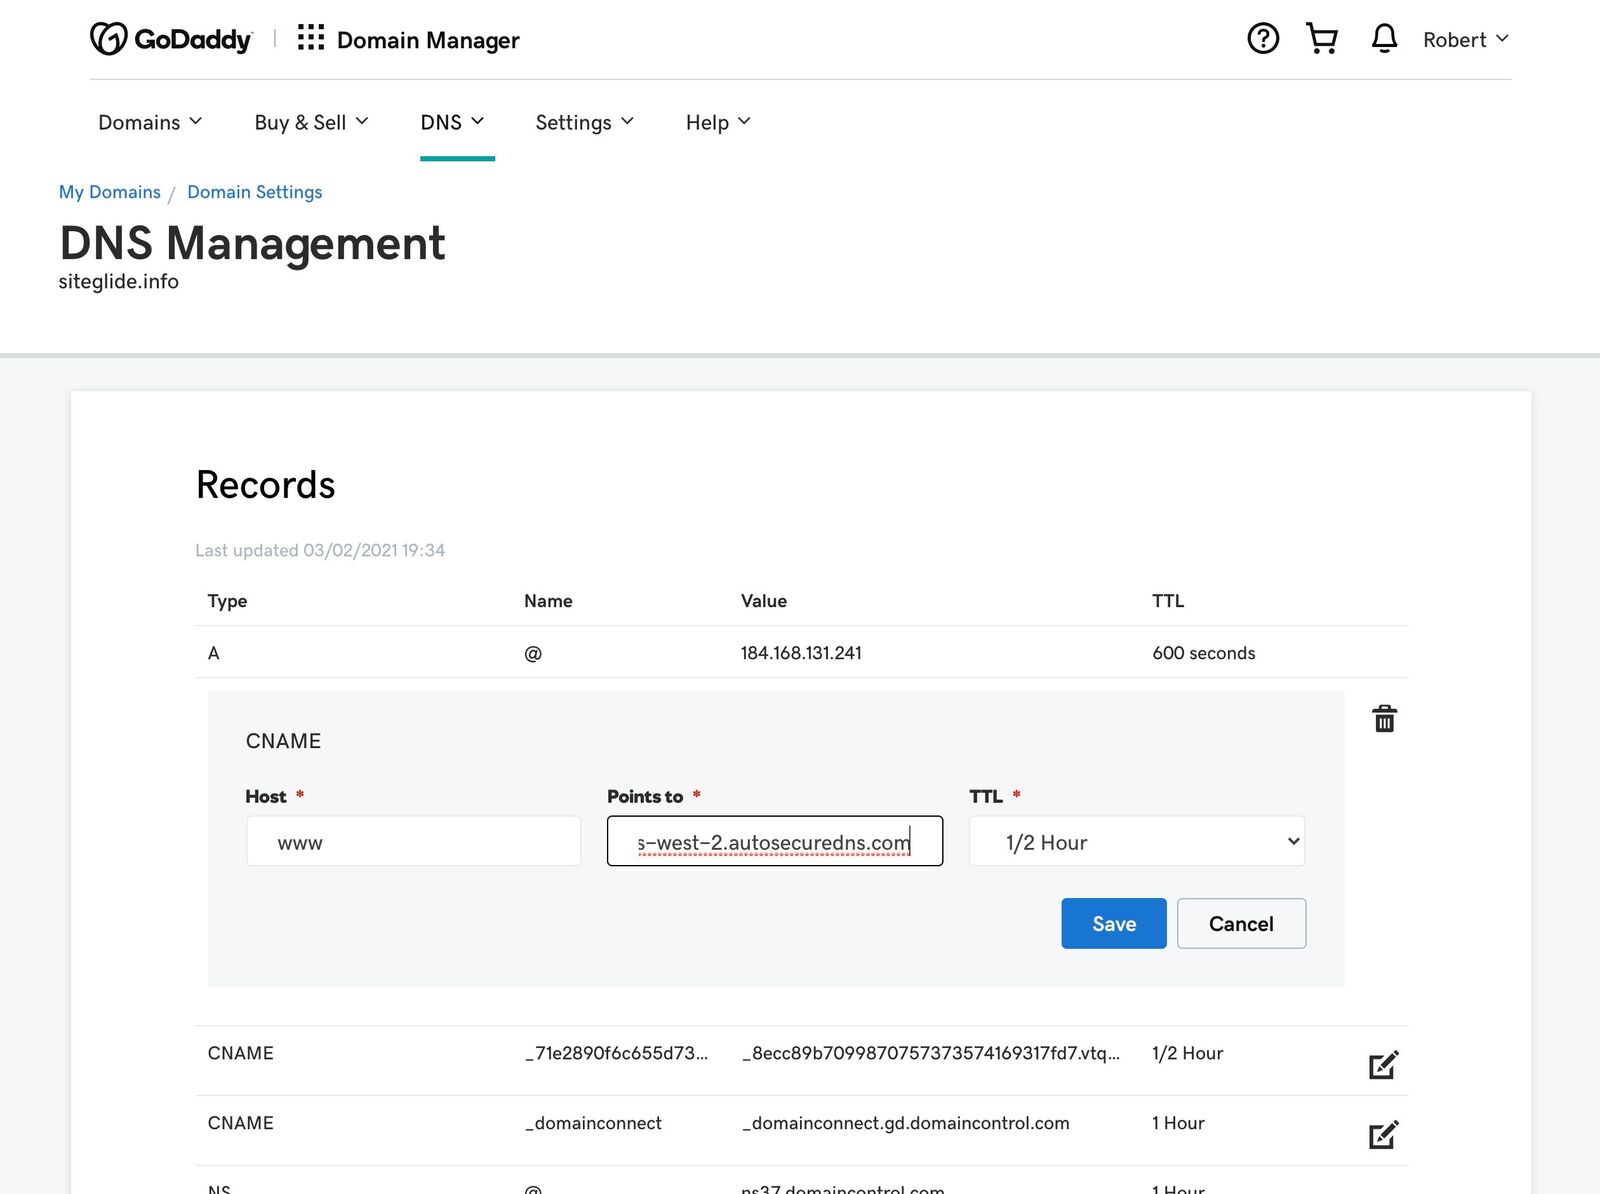
Once the verification CNAME record has propagated the WWW CNAME Record needs to be added in your DNS Control Panel (GoDaddy example):
The site will now be live via WWW (https://www.domain.com) but not via the root domain (https://domain.com). Complete Step 5 to fully setup the domain correctly. The domain should show as 'Live' under the Status column in Siteglide:
Most DNS Control Panels cannot correctly redirect the root traffic to the WWW over SSL so we recommend using an external service called Redirect.Pizza.
Just follow these steps to redirect your non-www to the www variant. The non-www is also sometimes called naked record or "apex" (screenshots below):
Create a redirect.pizza account.
Add your source. This should be the domain without www. For instance, enter example.com as your source.
Set the destination to the variant with www. Example: www.example.com
Press "Create redirect"
The required DNS change pops up. Go to your domain registrar to make this DNS change for the A record. This record may already exists '@'. Press 'edit' to edit it to the required DNS setting for redirect.pizza. For more info, see What are these DNS changes?
The DNS change is made! It may take up to 24 hours before the DNS is fully propagated.
These Steps can also be found here: https://redirect.pizza/support/redirecting-non-www-to-www


We strongly recommend Fully Delegating your domain to Siteglide (vs External DNS) for best results and to avoid additional steps redirecting the non-www to www.
Navigate to the Domains tab on the Site and click Add Domain:
Not sure which? Please read the pros and cons of each first: Fully Delegated vs External DNS
Just click the Fully Delegated box:
Once you select Fully Delegated you need to type in your root domain (without www) and then decide if it's going to be your default domain (most likely):
You should also ensure 'Enable WWW Redirect is on unless you're adding a subdomain. Finally you can choose to add other DNS records but you can always do this later too. If you toggle to add them now you just add records and fill in the fields.
Sit back and relax or go and make a coffee while the system does the work!
If you click the domain at this stage you'll just see the records you've added as Pending, there's nothing you can do at this stage so go grab that coffee!
You can refresh the page until you see the Status as 'Awaiting Propagation':
Then click into the domain and you'll see any records you've added plus the NS Records you need to add in your Domain Control Panel (GoDaddy etc):
Please ensure you've copied ALL existing DNS records from your current provider into Siteglide otherwise important services such as Email might fail.
To add more Records just click Edit Records and add new rows as required:
No matter how many times you've put sites live you'll no doubt be refreshing and questioning if it's worked from the moment you change the Nameservers!
You're looking for the Status to show as 'Live' in Siteglide but there are other ways to check progress listed below:
Typically you'll see some positive signals within minutes but you really do need to give it an hour or so (registrars will say 24-48 hours) before stepping in.
We recommend using the following tools to monitor propagation:
The following code example can be added to a Page Template and applied to the home/start page of a site to load a different start page for different domains added to the site.
This method does however remove some of the ease of editing for the client, as they will not be able to use Visual Editor to manage the pages that are setup this way. We'll look at adding a smoother point and click version to Admin later.
One use case for this approach would be where a client has a small chain of businesses that each have their own domain to target the area closest to them. Each of the sites are very small and the website structure is reasonably similar, and so it makes sense for the client to be able to manage all of them from the same Admin.
I'll now explain the code snippet above and how it works.
On the first line we get the current domain (context.location.host ) when the page loads and assign it so that it has a name of domain .
Next, we open a case to check the result of domain .
For each of the alternate domains we would like to check for, we create a when within the case . We include two versions of the domain to catch the majority of users. One that includes the www. and another that does not.
Inside each when we call in a content section that should contain all of the page content. We also define an SEO page title to match our page and wrap that in siteglide_head_scripts to automatically move it to the head on page load (Check out this document to find out more: Siteglide Scripts).
We then add an else at the end of the case to cover the default domain e.g. "if neither of these alternate domains are used, then do this" which acts somewhat like a catch all.
Finally, we close the case.
Using the above example, visitors will see unique page content to each domain when they visit. When they click on links on the page, they will continue to other pages on the site while keeping the same domain unless you hard code a full domain URL on a link. Please note that by adding more than one domain to a site, technically all content is accessible via all domains. Though you can effectively make content hidden from domains by not adding it to pages, it could still be accessed.


