
Loading...
Loading...
Loading...
Loading...
Loading...
Loading...
Loading...
Loading...
Loading...
Loading...
Loading...
Loading...
Loading...
Loading...
Email Templates work very similarly to Page Templates, see:
They can be useful in emails to add re-usable branding including headers and footers and email-friendly HTML, like an over-arching table.
You can create Email Templates in Site Manager in the Siteglide Admin.
Automations can be added in various places in Siteglide including:
Forms
WebApps
Modules
eCommerce
Navigate to the relevant feature and look for the Automations tab.
On the Automations tab there are 4 options, Integrations, Emails, API Calls and Custom:
Find out more about each type of Automation:
Click the 'Create New Integration' button and then choose a Siteglide Trigger and ensure you give it a name:
For Emails, API Calls and Custom you simply select the Trigger:
The setup and customisation varies depending on the Action type you use, please follow the relevant setup article:
In all Automation Types, you can access the data of an item. In Integrations you simply select your data from the dropdown fields and in Emails, API Calls and Custom you can use {{data}} or {{form}} in your code editor.
You can use the Enable toggle to control whether an Automation is Live. If Enabled it would run the next time that Trigger Event occurs.
You can delete any automation using the red Delete Automation button that appears at the bottom of the automation itself (within the page, not in the bottom bar):
Once you've read how our introduction to Automations, you're ready to start creating your own. Below is an example of a custom action in Automations. A custom action is a great place to run a GraphQL mutation if you want to modify something in the site's database.
This example will log data if the WebApp item's name contains 'Hello'.
Learn more about the Log liquid tag here: https://documentation.platformos.com/api-reference/liquid/platformos-tags#log - one caveat, to read logs you won't usually be able to use pos-cli with a Siteglide site, use siteglide-cli instead:
While this is now available for all users it is still in Beta and we value any feedback or reports of issues as at 14th October 2024. It's currently free to use but will soon be billed as a usage metric (we expect to merge it with API Calls). We will provide information and warning prior to making it billable.
Integration Automations are a quick and easy way to connect Siteglide with other Apps. They can be added in various places in Siteglide including:
Forms
WebApps
Modules
eCommerce
Just look out for the Automations tab (for WebApps and Module click the blue View Table button at the top of the List View of items):
You just need to give the Integration a name and select which Siteglide Trigger you want to use:
Then Select the App you want to connect to for the Action:
Then complete the rest of the steps that are typically unique to that app (Slack is just one example):
Then Connect your Account (SSO/OAuth):
Finally you can customise the Action using Siteglide Data:
We recommend for now creating Automations in the Siteglide Admin so that the triggers are correctly attached to the Form.
After this, you can pull with Siteglide CLI and modify the files, for convenience, should you wish.
Each automation Email body has an important section of YAML settings at the top. You can make any of these Liquid multiline if you want to use Liquid logic to determine them dynamically.
Use to, bcc, cc, reply_to and from for setting which email addresses should be used for each of these.
Subject does what you'd expect
Layout sets which you want to use
Trigger condition of true will allow the Email to send, false will disable it.
Check how the to line is made multiline to allow Liquid Logic- the two spaces indent is important. When you pull, you may find the syntax changes to a default.
When using CLI, make sure email templates are given the file_type, id and type metadata settings:
The ID must match the file name and be unique in your codebase.
Once you've read how our , you're ready to start creating your own. Below is an example of an API call in Automations.
This example will create a customer in Stripe, where the email address is WebApp fief'webapp_field_1_1':\
When you first set up your Site's automation emails, you may find there is a "Via SendGrid" warning for the email in the recipient's mailbox.
This warning means you haven't authorized SendGrid to deliver emails for you, so the mailbox provider considers that sent from SendGrid instead of your brand.
To authorize SendGrid to send emails you need to set up SPF and DKIM for SendGrid on your domain. This is a process also known as email domain authentication.
Setting up SPF and DKIM for SendGrid has 2 benefits:
your automation emails are more likely to reach the inbox;
the "Via SendGrid" warning is removed, and your emails are perceived as coming from your brand, instead of SendGrid. This boosts user engagement, as the user is more likely to open the email.
This option allows SendGrid to authenticate and configure the DNS changes for you in your DNS without needing to add them manually. Currently, only GoDaddy is supported for this setup method.
See the list of DNS providers that are supported by SendGrid's automated setup.
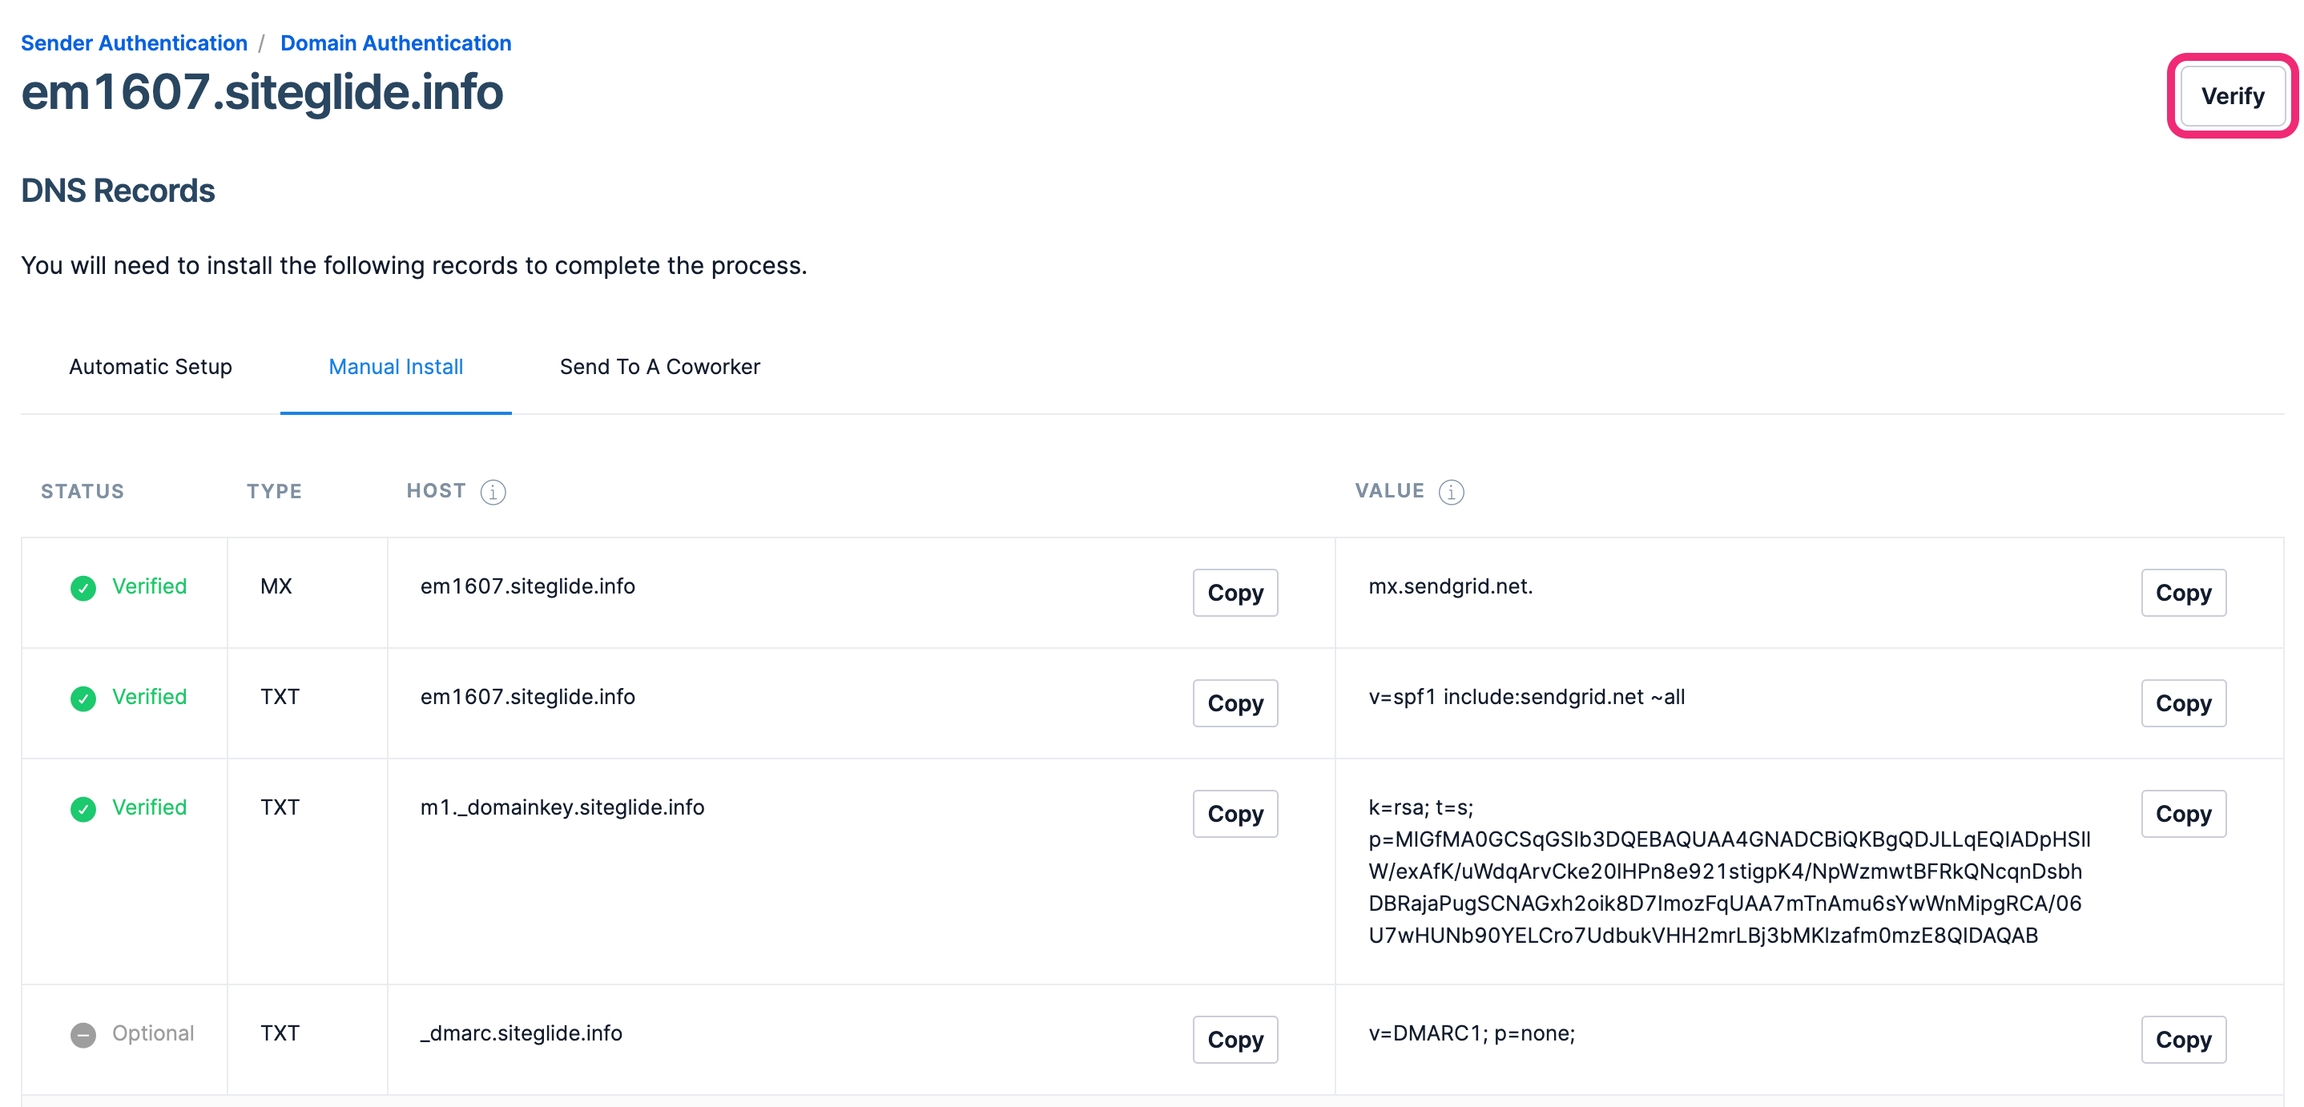
Manual Setup If Sendgrid cannot automatically finish the setup, you will be taken to the Manual Setup tab where you will be provided with records to add to your DNS manually. If you cannot modify your domain's DNS records, you can email the records to a colleague using the Send To A Coworker tab. The email includes a direct link to the records
Both automatic and manual setup begin the same way with the "Setup steps required for both automatic and manual setup" that follow.
Automatic Security
Automated security is different from automatic setup. Automated security allows SendGrid to handle the signing of your DKIM and the authentication of your SPF with CNAME records. This allows you to add a dedicated IP address or update your account without having to update your DNS records. Find a detailed explanation of how this works on the Sendgrid Documentation. Automated security defaults to On. If your DNS provider does not accept underscores in CNAME records, you will have to turn automated security off and use MX and TXT records.
If you turn off automated security, you are responsible for managing and updating the MX and TXT records yourself.
Your site's Sendgrid credentials need to be generated by Siteglide Support.
See below the different options to request the logins:
Portal Ticket: Submit a portal ticket
Discord Agency Channel: Message on your agency channel for support
Info Required:
Site name or ID
Optional: Additional context to the issue you are facing or reason for requesting logins.
Log in to the SendGrid dashboard using your credentials.
Go to Settings/Sender Authentication/Domain Authentication, and click Get Started.
In Advanced settings, there is an option to turn on "link branding". We strongly suggest you leave this off (unless you know what you are doing), as it can cause problems when linking to assets on our CDN from emails.
SendGrid has now created a list of records to add to your DNS including the 2 DKIM records using selectors s1 and s2 respectively.
If you chose the Automatic setup option and your hosting partner is GoDaddy. SendGrid will automatically make the DNS changes for you.
Although a DMARC record is provided by Sendgrid, it's not required to verify your domain. However it is still important for email delivery and brand reputation as it tells a participating receiving email server what to do with a message that fails both SPF and DKIM validation. It can protect you from having malicious people sending emails from your domain.
Please note: "v-DMARC1;p=none" is the simplest policy and organisations may have stricter DMARC requirements. Therefore please confirm before adding or updating an existing DMARC record.
Once you add the DNS records to your domain, return to the SendGrid App UI and click Verify to finalise the setup.
Go to Settings/Sender Authentication/Select the Domain and then select Verify. \
\
Enter the domain you want to authenticate (e.g. siteglide.info) and click the Next button.
We'll add articles here that help you push the boundaries using GraphQL.
Staging sites are great as a place to start building your business, or as a place to develop new updates to a site before they're ready to see the world. However, what if you did a Site Copy of your live site to test a new feature on staging and accidentally sent an unfinished email to real customers?
Don't panic! That can't happen!
Staging sites deliberately block outgoing emails.
Okay so how do we test?
Click the "Configuration" tab:
Enter the email addresses of anyone who would like to receive test emails for this site. It doesn't matter if they are Siteglide users or not: e.g. example@siteglide.com,example@agency.com,example@client.com
When you get to step 3, you'll realise that being added to this list can mean getting a lot of emails, so make sure you get permission before adding people to this list or they may be annoyed!
E.g. Test submitting a Form which has an Email Automation attached, even if your email address is not in the to field.
You'll see that if you added your email in step 2, you'll receive all emails on the site, regardless of who they are addressed to. This makes it easy to test emails without running lots of email accounts for different user types.
If you're getting all the emails, how do you check if they go to the right person?
When the email is blocked from sending as normal, the system adds the address it would have sent to in a production environment in brackets to the subject line on a staging site. You can use this to identify the test email in your inbox or check if it is sending to the correct address before going live.
Below shows a simplified version of the Folder Structure. It will grow the more automations you add.
We recommend setting up Automations in the Siteglide Admin and then pulling to inspect and modify what you need to.
Individual Email and API call actions can be modified in the notifications folder.
The JSON files which control triggers and which actions to run are stored in the tables folder. Again it's easier to modify these in the Siteglide Admin.
"FIC" stands for "Form Create" - it is a shorthand for the trigger which can be expected to run the code in the file.


Automations are a set of Triggers and Actions, which can be applied to Forms, Modules, and WebApps.
For example:
Trigger - When a WebApp item is edited in Admin
Action - Send an email to the content approval team
Triggers
Admin item create - Modules (excluding eCommerce Orders), WebApps
Admin item update - Modules, WebApps
Admin item delete - Forms, Modules, WebApps
Front-end item create - Forms, WebApps
Front-end item update - WebApps
Front-end item delete - WebApps
Actions
API Call (limited to 1 per trigger)
Custom (limited to 1 per trigger)
The body of an Automation, whether it is an Email Notification, Custom Liquid Action or API call is a Liquid file, so they can include includes/partials. You can also output fields that were submitted in the Form.
There are a few limitations of this Liquid rendering environment:
The export, content_for and yield tags are not supported in this environment, which means:
The ordinary constants file we include on Pages to make variables like Company Information work, won't work here. See here instead: constants_json
Many Module and WebApp layouts won't work in this context, as they rely on the export tag to pass data between sections of the layout.
You can however use other Liquid Includes / Partials like Content Sections and Code Snippets to organise code within an automation. This is especially useful for code which needs to run in multiple automations.
Note- this won't work with WebApps and Modules, see section below!
Outputting all available submission data as JSON tree for testing purposes:
{{form}}
Output the User's core fields:
Output a custom field (note, this includes CRM fields and Custom Field Set fields, as they will always have a corresponding field in the case which contains a snapshot of the submission data):
Note, only the database IDs of your fields can be used here, not their human-friendly field names. These can be found in the form_configurations folder if you use Siteglide-CLI. Or you can output the {{form.properties}} JSON to see all of the options available.
These code suggestions are intended for when you add an automation for WebApp or Module create or edit.
Outputting all available module/webapp data as JSON tree for testing purposes:
{{data}}
Output a core field:
{{data.module_field_3_1}}
Output a custom field:
{{data.module_field_custom_3_1}}
Outputting data is slightly different when the trigger is an updated WebApp or Module item, because you have access to both the orginal data and the newly updated data.
Outputting all available module/webapp data as JSON tree for testing purposes:
{{data.originalData}} <!-- Original Data-->
{{data.data}} <!-- New Data-->
Output a core field:
{{data.originalData.module_field_3_1}}
{{data.data.module_field_3_1}}
Output a custom field:
{{data.originalData.module_field_custom_3_1}}
{{data.data.module_field_custom_3_1}}
Make a Comparison


We strongly recommend that you authorize Sendgrid to send emails from your domain to avoid them going to spam filters, or being rejected from sending by your DMARC policy.
Once you've read how our introduction to Automations, you're ready to start creating your own. Siteglide Automations can send transactional Emails powered by Sendgrid. By transactional emails, we mean an email sent to, or c.c.ed to one or a few relevant people when a trigger occurs. Below is an example of an email in Automations.
This example will send an email to 'richard.hendricks@siteglide.com' with a link to the newly created item.
Note, for forms, use the form variable for submitted data, for webapps and modules, use the data.data variable. See Reference
