Loading...
Loading...
Loading...
Loading...
Loading...
Loading...
Loading...
Loading...
Loading...
Loading...
Loading...
Loading...
Loading...
Loading...
Loading...
Loading...
Loading...
Loading...
Loading...
Loading...
Loading...
Loading...
Loading...
Loading...
Loading...
Loading...
Loading...
Loading...
Loading...
Loading...
Loading...
Loading...
Loading...
Loading...
Loading...
Loading...
Loading...
Loading...
Loading...
Loading...
Loading...
Loading...
The Cart and Checkout flow is most likely right for you if your site:
Will sell a selection of products
Physical or Digital
Where the user can select one or many to purchase at once
Optionally charge for shipping
Optionally offer discounts
Bulk Discounts
Discount Codes
Include tax in prices
Will eventually want to sell the products, but as an extra step will want to send an official quote to the customer for their selection of products.
Customise the way Products look on their automatically generated Detail Pages and add functionality for adding the Product to the Cart.
You have created Products in the Admin
This Tutorial will show you how to output information about a Product on its automatically-generated Detail Page.
It will cover how to:
Find where Product layouts are stored on Code Editor
Develop a wrapper.liquid file
Include an item.liquid file
Add functionality for a User to add the Product to Cart
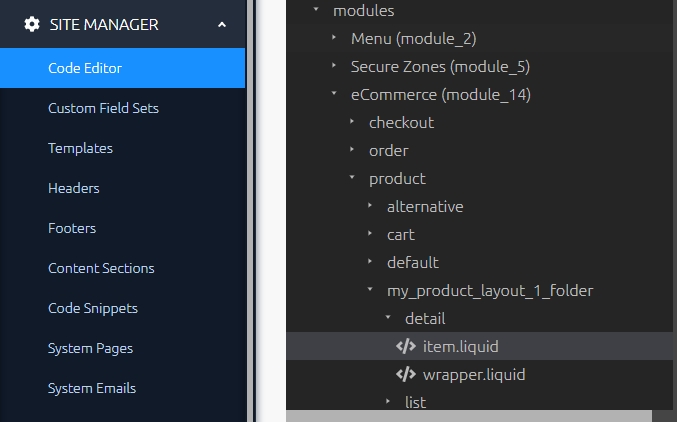
In SITE MANAGER/Code Editor, the folder structure for eCommerce layouts is as below:
layouts
modules
module_14
product
name_of_my_layout
list
wrapper.liquid
item.liquid
detail
wrapper.liquid
item.liquid
product_attributes
my_attribute_layout.liquid
See more:
To create a new set of Product layouts- create your folder at the level of "name_of_my_layout". Inside that, the folders and files should be created as shown above.
As with list views, the detail folder inside your new layout folder should contain a wrapper.liquid and an item.liquid file. Refer to the folder structure at top of the document for reference. You also have the option of creating an attribute layout which can be included inside your item.liquid file to show Product Variations.
wrapper.liquid -- detail view example
This is the file for the main section code e.g. a section title or padding. You will need to use the following liquid to include your item.liquid file inside the wrapper and give it access to information about the Product:
item.liquid -- detail view example
Unlike the List View, the code in the item.liquid file in the Detail folder will only be displayed once instead of looped. Inside the item.liquid file, you'll have access to the "this" object, which contains the fields you'll need. See reference for available fields or output {{this | json}} in the item.liquid file to see the exact data available to you.
To create a button to add the current Product to the Cart use the following Liquid code
See more:
In order to use the "Add to Cart" Button, you'll also need to have an input element where Users can select the quantity they'd like to add. Make sure it has the correct data-attribute.
Similar to WebApp List Layouts, a Product List Layout can allow users to browse Products. It can be filtered and sorted too!
You have created Products in the Admin
This Tutorial will show you how to output a list of Products on your site.
It will cover how to:
Find where Product layouts are stored on Code Editor
Develop a wrapper.liquid file
Develop an item.liquid file
layout - choose the layout file for this list.
category_ids - filter the List by these category ids
sort_type - the field you wish the sort by
sort_order - 'asc' or 'desc' - the order you wish to sort by.
type - Should be list, for a List View layout. This can also be used to display different types of layouts, like a Cart in a different context.
show_pagination - if pagination should be displayed after the products. Default is 'true'
If you need to refer to the folder structure for where layout files should go, refer to this:
To create a new set of Product layouts- create a new folder bearing the name of your layout, and create within it:
product
name_of_my_layout
list
wrapper.liquid
item.liquid
detail
wrapper.liquid
item.liquid
A list view for products is made up of two parts.
The wrapper contains the code for the main part of the section you are building. For example, the section title or some margin or padding that separates your list from other sections.
In the wrapper.liquid file, it is important to include the liquid file which loops over the Product items:
The item_layout parameter should be the name of a liquid file in the same folder as the current file. Usually this will be "item", but you could have an alternative Layout.
item.liquid -- list view example
This file contains the code for each iteration of the loop that displays the Products. You should expect this code to be rendered multiple times; once for each product displayed in the list. (Hint: Try not to run any GraphQL calls inside a loop or item.liquid file, as they would have an impact on performance. It is better to run these inside the wrapper.)
Output all data available in the "this" object: {{this | json}}
In order to help the JavaScript understand which Quantity and Attribute Control belongs to which Product, we've added a new requirement to Product List Layouts. Please add the following data-attribute on the highest-level HTML element in your item.liquid file.
In this example, the highest level element in the file is a <div> element which is wrapped around the rest of the content in the file, but yours could be any element. The important thing is that this element is wrapped around any controls in the File.
For old sites which do upgrade the eCommerce Module, but do not add this data-attribute, we'll add a console log in dev-tools to act as a reminder, but any functionality which worked previously will continue to work.
As with Detail Layouts, you'll need to include the following Liquid and HTML code within the item.liquid file. It's also now important that these elements lie within the element with the data-product-group Attribute, when you're building a List Layout. See the section above for details.
The "Add to Cart" Button
For more on developing the Add to Cart Button:
The Quantity Control
This is mandatory, but can be hidden and hard-coded to have a value of 1, if you want to simplify the UI:
Attribute Control
Full Example: Example of an item.liquid file in a Product Layout which supports Adding to Cart:
You have Installed the eCommerce Module
The Siteglide Ecommerce Module makes it easy to set up a secure and reliable Shopping Cart and Checkout flow. As usual, you can customise your layouts at every step.
In this tutorial, we will show you how to create the simplest Cart and Checkout flow- the Guest Checkout. Users can buy Products without having to sign in, but their details are stored in the CRM so the Site Owner can send them their Products.
In eCommerce/Settings, select the desired default currency for your Site:
In eCommerce / Products, create at least one product with a price:
Check the "Pricing" tab to add a price.
Users will need to see your products in order to access their Product Detail Pages, or add to their Carts directly. You can use the following code to add a Product List view with the default layout:
To set a Detail Layout, start at eCommerce / Products and click the "View Table" button:
Select the Detail Page Template and Layout:
...and Optionally on your List View!
Make sure your Product Detail pages have an add to Cart Button in their layout’s item.liquid file.
This liquid include tag will add the "Add to Cart" Button:
`
`
`
`
If adding an Add to Cart Button to a List View, make sure that the highest level component in the wrapper.liquid file has the HTML data-attribute added: data-product-list.
Create a new Page for your Cart and use liquid to include the Cart.
`
`
Note- the Cart does not need to be on it’s own page, but this is the easiest place to start.
If you are using SiteBuilder, or have already added your own CSS for the Cart, we recommend settingremove_default_css: 'false'
Use the layout parameter to select the folder which contains the wrapper.liquid and the item.liquid file you would like to use for your layout. For now, you can use the "cart" layout which is included in the eCommerce Module.
This will store a paying User against the CRM and submit their payment details securely via your chosen Payment Gateway.
You will need to add the following information when creating your form:
Form Name: e.g. Checkout Form
Redirect URL - This is the relative URL you want a user to be redirected to after submission of payment details e.g. a confirmation page.
In the payments tab, toggle "Use as a payment form?" on
Payment Form Type will appear under the payments tab. Select "Standard Checkout".
Save your changes.
Include the Checkout Layout in your page - use the ID from the CMS / Forms list as the form_id parameter. If you use the Toolbox to add this code, you can lookup your form by name.
`
`
The layout parameter should refer to the folder which contains your form layout file. This file exists here:
layouts/forms/form_2/default.liquid
For now, you can use the "default" layout that is included with the eCommerce module.
If the page is visited while the user has an empty cart, an alternative "empty" layout will show. The default form layout will automatically add an empty layout at the path:
layouts/modules/module_14/checkout/default/empty.liquid
If you create a custom layout, you should also create an empty.liquid file, renaming the default folder in the filepath above with the name of your form layout.
Users will be added to the CRM in Admin.
You can see the records of transactions in Admin by navigating to the Orders list or finding the User in the CRM.
You've now completed the simplest version of the Cart and Checkout Flow, however there are plenty of improvements you can still make and lots more to learn.
After a User has submitted your Checkout form, an order will be automatically generated. You can see a list of orders under ECOMMERCE/Orders in the left-hand menu.
Click on the name of the order for more information.
It is more difficult to give "Guest" Users access to their past orders, as you would need to verify that the order belongs to them, potentially manually by asking them to provide some information.
You can add Secure Zones to this flow in the next article, allowing you to easily show the User their past orders when logged in:
As a user buys a Product, the Inventory decreases accordingly.
A User cannot buy a Product if its Inventory is 0, but you can also hide Products that have sold out from the Product List Views.
This Article will look in detail at the JavaScript function which updates the Product price as the customer selects Attributes.
Your should be updated to version 1.0.5 to get the latest version of this feature described by this Article. Earlier versions of the Module will have limited support for this feature on Product List views.
You have on some of your Products and nested inside your Product Layout.
On the Product List and Detail Views you can provide customers with an option to select Product Attributes- changing features like "size" or "colour", depending on the Product.
This Article will look in detail at the JavaScript function which achieves this and adjusts the displayed Price of the Product appropriately.
A note on security: the prices we are working with in this topic are cosmetic only. There's no need to worry about malicious users "choosing their own prices" at this stage, as prices will be calculated afresh securely on the server if and when an Order is created.
This function will update the currently displayed price of a Product to take into account any selected Attributes.
To optionally set the initial prices to be displayed on:
Product Detail View
Product List View (support added in eCommerce version 1.0.5)
To update the prices to be displayed on:
Product Detail View
Product List View (support added in eCommerce version 1.0.5)
To display the initial price of a Products on the Product List, or Detail View, on Page Load, you can run the function within the following Event Listener. No arguments are required.
To watch an Attribute for change, add the listener: onchange="s_e_update_price()"to the <select> element in your chosen Attributes Layout:
The JavaScript looks for data in the HTML attributes in order to make its calculations. In the usage notes below we'll detail everything you need to provide for this function to do it's work.
The purpose of this function is to dynamically update the displayed Price, but the choice of where this should be within the Layout is up to you.
To mark an element within the item.liquid file as being the element which will receive the dynamic price as its text content when calculated, add the following HTML attributes:
data-price-control
data-currency-control
The value of these Attributes should be set using Liquid to the Product's initial price and currency:
In this example above- we also add the initial Price to the text content of the element using Liquid on Page Load. Instead, you can run the function on Page Load to display the initial price, should you choose.
In order to add the prices of Attributes to the base price- you'll need to define the prices against the <option> element that contains a selectable Attribute Option: data-attribute-price-control="{{option.price.raw}}"
For example:
item.liquid fileIf you're using this function on the Product List View, you'll need to carry out additional steps to define the container for each Product. This helps the JavaScript to smoothly identify relationships between Products, their Prices and their Attributes.
The HTML attribute data-product-group should be added to the highest level HTML element in your Product Layout item.liquid file. Which type of tag this element is doesn't matter- the important thing is that all Prices and Attributes related to this Product are nested inside this element.
If you do not add this Attribute- the JavaScript will treat the Product List like a Detail view- and you may experience unexpected behaviour like all prices changing at once.
This function is useful for updating the displayed price of a Product when new Attribute Options are selected- or removed- by the User / Customer.
While building Product and Attribute Layouts, a large range of dynamic data is available- here is a full reference guide.
The "this" object can be accessed on Product detail/item.liquid, list/item.liquid and attribute layout files. It contains the properties of the current Product and contains further relevant objects e.g. Price.
The entire "this" object can be outputted on the page for reference: {{this | json}} The following fields are available:
Custom Field Set data linked to Products is available in Product detail/item.liquid, list/item.liquid and attribute layout files.
Any Custom Field Sets that have been associated with the product will be stored under: {{this.cfs_data}}
You can output the above liquid in the item.liquid file to see all of Custom Field Sets associated with the Product. Each of these will have the key "cfs_1", "cfs_2" etc. For example, a developer has created just one Custom Field Set to store information about the Guarantee on the Product. The field can be accessed via: {{this.cfs_data.cfs_1.Guarantee}}
The Price object contains all the information you need to display the Product's price in the format you want. It is available in Product detail/item.liquid, list/item.liquid and attribute layout files.
The Inventory object contains the fields related to the current Inventory of this Product. It is available in Product detail/item.liquid, list/item.liquid and attribute layout files.
These are available once Attributes have been added against the Product in Admin and you are inside a detail/item.liquid file or an Attribute layout file.
You can access the Attributes Object via the following liquid output: {{ this.product_attribute_options }}
Inside the Attribute Layout, you can access just the Options for that specific Attribute: {{ product_attribute_options }}
You can also access the name of the Attribute this Layout is currently displaying: {{this_attribute.properties.name}}
As explained in the Attributes Layout Doc, we recommend you loop over the object and access the fields via the "option" liquid variable.
Assuming the above example liquid forloop has been implemented, you can access the fields in the table below. Remember the "option" liquid variable can be renamed, so if you have done this, replace "option" with the name you have given the variable. The Object contains Attribute Options and each of these contains information on the Attribute it is linked with.
Information about how to output information about volume pricing can be found here:
How to use Module Custom Fields to output similar, related products
Your is updated to at least version 1.2.0
You have already and outputted them in List or Detail Layouts on the Site
Module Custom Fields allow a wide range of use cases for connecting up different areas of your Site. In this Article we'll look at how you can create a new Custom Field for your eCommerce products to store similar, related Products which could be displayed on the Product's Detail Page.
You could of course use this same technique with the Blog Module or any other Module or WebApp.
To add a Custom Field to Products, first select Edit Module Structure from the Products List in Admin.
At the bottom of the available fields, you can find the Custom Fields section, and press the "Add new field" button.
The name of your field can be whatever you want, here we'll call it Related Products. The Datasource Multi type prompts us to choose a Module or WebApp that we will be able to select Items from.
When you're ready, press save and your new Custom Field will be set up. You'll then be able to use this field when creating and editing Products.
In this example, we'll edit the new Custom Field on an existing Product to create a relationship with another Product. From the Product Edit Page, select the Custom Fields tab:
As we used the Datasource Multi field type and selected Products as the Module to be linked to, Siteglide knows what we're trying to do and will help us find the related Items.
Select as many as you need. Each Product's unique ID will be stored in array format in your Custom Field.
When you're ready, save the Product.
For the next steps (3 - 6), we'll be navigating to Code Editor to develop custom Layouts to display the Related Products Front End. We'll start by working in the "item.liquid" file of the Layout you're using for the Product Detail View. We'll nest a new List of Related Products inside this Detail Layout.
Inside the item.liquid file, we can access the Custom Field by name:
It is sometimes more reliable to access a field by its ID, in case the name is changed in future. E.g. {{this.properties.module_field_custom_14/product_1}}
This outputs an array of the IDs of each of the related Products stored against our current Product. It should look something like this: ["55","75","147"]
In Step 5, we'll need to nest a new List Layout of Products inside the Detail Layout and filter this by the IDs of our Related Products. However, the IDs are currently in an Array format and the include Liquid tag's item_ids parameter expects a comma separated String.
We can change the type by assigning a new variable:
Next, we need to output a Product List, nested within our existing Product Detail Layout.
Item Ids Parameter
Without the item_ids parameter, our List outputs only the first few Products alphabetically, instead of fetching our dynamic Related Products.
We can change that by adding the item_ids parameter and feeding in our comma-separated String of IDs (that we stored in a new Liquid variable):item_ids: related_products
Datasource Parameter
datasource: 'true' When you output an include inside a Detail Layout, by default Siteglide will try to fetch a Detail Layout. This is one reason why it's important to set the datasource: 'true' parameter, which will then cause Siteglide to look for a List type Layout.
Another benefit of the datasource: 'true' parameter is that if no Related Product IDs are available, the List will return empty, instead of returning an unfiltered List. This prevents the List from showing unrelated Products in this situation.
Per Page Parameter
per_page: '3' In the example, the per_page has been set to 3. In some cases, you may wish to limit the number of "related" results in this way, so they don't distract from the main subject of the Page. It is completely optional.
Layout Parameter Select the name of a Product List Layout you'll use to style how the dynamic Related Products List will look (see Step 7).
Optionally, you can add Liquid logic to only display the subtitle and Related Products content when the field is not empty. As the field contains an array, a safe way to check if it holds a value is to check its size (Liquid for the length of the array).
You've now completed the Step by Step guide for adding Related Products.
We're introducing Discount Codes to our eCommerce Module.
Your Client will be able to define and manage codes in the Admin- and manage their offers by setting the release and expiry dates, as well as the maximum number of uses in advance.
You'll be able to implement options in the Cart and Checkout for entering discount codes and the Module will work out the discounted costs for you.
You can see a list of all Discount Codes under the eCommerce Menu.
You can set the following fields when you create or edit a Discount Code:
Item Name - Gives the discount a name
Weighting - (optional) - Used in sorting
Release Date - When should the discount code start being valid?
Expiry Date - When should the discount code stop being valid?
Enabled - Should the discount code be enabled or disabled?
Code - A String of characters for the code a customer will need to enter for - the discount to be valid.
Type - Should the discount be a percentage of the total Cart value, or a fixed - amount?
Discount Value - How much of a discount should be given when this code is - entered? Choose a value appropriate to the type you selected e.g. 20 for 20% - or 20.00 for $20.00
Minimum Spend - Often your Client will want to use the offer to up-sell to the - customer. By setting a minimum spend, the customer will need to spend this - amount before the offer can be used. The offer will apply to the entire value - of the Cart still, not the difference between the minimum spend and the Cart - value.
Uses Remaining - This sets a total number of uses before the offer - automatically expires. This does not measure the number of times an individual customer uses the offer, rather it measures the number of times the offer has - been used globally. If your Client does not want to set a limit, you can set a - very large number- or your Client can increase the number when it runs low.
Valid on Payment Form Type - Choose 'Checkout' (default), 'Basic Payment' or 'Subscription'. The discount code will only be applicable to the specified - Form type. This is useful when you have both Checkout Forms and Basic Payment Forms on your Site with different purposes.
When "Valid on Payment Form Type" is set to "Subscription", a "Coupon" will be created on the connected Stripe account. Therefore, extra fields are needed for this type:
Number of Months to Discount - Even if your Subscription's Interval is days or weeks, this field must be measured in whole months. The discount will apply to - every invoice until the months are finished, after which the price will revert - to the price defined in the Subscription's plan.
Stripe Coupon ID - This field will be filled automatically. You can use it to look up the associated Coupon in the Stripe Dashboard.
From the List View, you can create a new Discount Code.
Find your code in the List, and use the pencil icon to edit.
From the Edit screen, you can delete a Discount Code.
If customers have used a Discount Code to make a purchase, you'll be able to see this against their Order. You can see customers' Orders under the eCommerce Menu in Admin.
In the next Article, we'll show you how to add and develop a Discount Codes Layout.
This will allow Users to type in and apply a Code, or remove a Code if it no longer applies and is preventing them from checking out:
Products in eCommerce are where you can add and manage your own products and services with ease.
Here, you can add new products; import and export these; add attributes; control inventory and much more.
Where can you find Products?
While viewing your Site Admin, use the left-hand menu to click "eCommerce" and expand the sub-menu. Next, click on "Products" to view a list of Products on your Site.
use_search - See
use_adv_search - See
As it is inside the loop, the item.liquid file has access to the "this" object and dynamic information specific to an individual product. A full reference for the fields you can use can be found or you may find it convenient to output the "this" object on the page you are developing:
As this code can be complex, so please refer to the doc for further information, or take a look at the full example below.
has an out-of-the-box Product List design ready for you in a Bootstrap 5 or Tailwind version.
has an out-of-the-box Product Detail design ready for you in a Bootstrap 5 or Tailwind version.
Learn more about Product Detail pages .
This needs to be in the item.liquid file to work, because this will have access to the correct data for this Product. To add a custom Cart Add layout, see the for the correct directory and use the component_layout parameter to reference it:
Learn more about Cart Layouts
has an out-of-the-box Cart design ready for you in a Bootstrap 5 or Tailwind version.
You can add a form by navigating to CMS/Forms in the left hand Menu and then clicking the "+ Add New Form" button in the top right of the page. Learn more about forms here: .
If you are using the PayPal Payment Gateway, you will need to carry out an .
has an out-of-the-box Checkout Form Layout design ready for you in a Bootstrap 5 or Tailwind version.
Remember, you will need to use the test cards from your chosen Payment Gateway. Find more information
See more information about Custom Field Sets .
You can style and write Liquid for the Related Products List Layout in the same way you do for any . For example, you could provide a link to the Detail Pages of those Related Products using the Slug property.
Field Name
Liquid Tag
Description
Item Name
{{this.name}}
The Product's name
Item Slug
{{this.slug}}
The part of the URL for this Product's Detail Page which refers directly to this Product
Creation Date
{{this.create_date}}
The date the Product was created in Admin
Last Edit Date
{{this.last_edit_date}}
The date this Product was last edited in Admin
Release Date
{{this.release_date}}
The date this Product is scheduled for release, or was first released on the Site. (A Product will not appear in the list if it has not been released.)
Expiry Date
{{this.expiry_date}}
The date this Product will be no longer visible on the Site. (A Product will not appear in the list if it has expired.)
Enabled
{{this.enabled}}
A "true" or "false" boolean value. If "false", the Product will not appear in the list.
Category Array
{{this.category_array}}
An array of ids of categories associated with this Product.
Description
{{this.Description}}
A description of the Product.
Image
{{this.Image}}
This is the main image for the Product, but more can be added with Custom Field Sets.
Field Name
Liquid Tag
Description
Price ID
{{this.price.id}}
The unique ID of this Product's price.
Product ID
{{this.price.product_id}}
The unique ID of the Product this Price belongs to.
Currency
{{this.price.currency}}
The currency code for the currency used by this Product e.g. "GBP".
Price Charge
{{this.price.price_charge}}
The price of the Product as an integer e.g. for the price "£200.00" this field will display "20000"
Display Price
{{this.price.price_display}}
If the optional field Display Price was filled out when the Product was created, this will show that price as an integer, else, it will output null. This could be for example the RRP or price before tax.
Currency Symbol
{{this.price.currency_symbol}}
The HTML entity for the currency symbol. e.g. "£" outputted on the page will display "£" when HTML is rendered.
Price Display Formatted
{{this.price.price_display_formatted}}
If the optional field Display Price was filled out when the Product was created, this will show that price as an decimal number, else, it will output null. This could be for example the RRP or price before tax.
Price Charge Formatted
{{this.price.original_price_charge_formatted}}
This is the price that will be charged to the user, formatted into dollars and cents.
Price Charge Before Tax Formatted
{{this.price.price_charge_before_tax_formatted}}
This is the price before any tax is applied, formatted into dollars and cents.
Field Name
Liquid Tag
Description
Inventory ID
{{this.inventory.id}}
The unique ID of the object containing the Product's Inventory.
Enabled
{{this.inventory.enabled}}
A "true" or "false" boolean, defaults to true.
Product ID
{{this.inventory.product_id}}
The unique ID of the Product this Inventory Object belongs to.
Quantity
{{this.inventory.quantity}}
The number of products in the inventory.
Inventory Type
{{this.inventory.inventory_type}}
The type of Inventory. Currently, only "Global" is available.
Display Type
{{this.inventory.display_type}}
This stores the policy on what to do when the Inventory reaches zero. Either the Product can not be ordered, or it should be hidden from view.
Field Name
Liquid Tag
Description
Attribute Option ID
{{ option.id }}
The unique ID of this Attribute Option
Attribute Option Name
{{ option.name }}
The name of this Attribute Option
Attribute Option Chargable Price
{{ option.price_charge }}
Chargable price for this Attribute Option
Attribute Option Chargable Price Formatted
{{ option.price_charge_formatted }}
Formatted chargable price for this Attribute Option
Attribute Option Display Price
{{ option.price_display }}
Display price for this Attribute Option
Attribute Option Display Price Formatted
{{ option.price_display_formatted }}
Formatted display price for this Attribute Option
Attribute Option Image
{{ option.image}}
The image for this Attribute Option
Attribute ID
{{ option.product_attribute.id }}
The Unique ID of this Attribute
Attribute Name
{{ option.product_attribute.name }}
The Name of the Attribute e.g. Size or Colour
Attribute
{{ option.product_attribute.product_id }}
The Unique Product ID that this Attribute is associated with.
This Article explains how to output a Discount Codes Layout in either Basic Payment Form, Cart, Checkout or Subscription Layouts
Discount Codes allow your Client to provide special offers to their customers.
You can learn how to set up Discount Codes in the Admin here.
The role of a Discount Code Layout is to give the customer an opportunity to enter and apply a Discount Code on your Site. Additionally, once a code is applied, the Layout will give the customer information about how their code has been applied along with any terms and conditions, and the opportunity to remove the code.
This Article will explain how you can include a Discount Codes Layout in either your:
Cart wrapper.liquid file
Checkout Form Layout (Discount Code Layouts for the Cart and Checkout will have the same syntax).
Basic Payment Form Layout - This will have slightly different syntax due to the unique properties of Basic Payment Forms, but we'll cover this below.
Subscription Form Layout - This will have slightly special considerations because the discount has the potential to be applied to all invoices for a specified number of months. It's also possible to use Subscription Discount Codes to take 100% off the price giving a free trial.
Once a customer uses the button in the Layout to successfully add a Discount Code, this will be stored in their session alongside any Cart Data. We'll store one code at a time for each payment type, with Basic Payment Forms storing their codes in {{context.session.basic_payment_discount}}, Cart saving its codes in {{context.session.cart_discount}} and Subscriptions saving their codes in {{context.session.subscription_discount}}.
When a customer completes a Payment Form, the Server-side checks will apply the code and reduce the amount they are charged. This means your Site will be secure and safe against malicious users choosing their own discounts.
The screenshot below shows how the Discount Code Layout can be nested inside the Cart. However, step 1 also applies in all kinds of Layout.
The following Liquid will add the Layout:
The only parameter you'll need will be layout which refers to the file name of the Layout. We'll look at where to create the Layout files in Step 2.
In order to better support adding Discount Code Layouts on Forms, we've added the option to reload just the Layout, instead of the whole Page. The main benefit of this is that Users will not have to refill their form data after adding a Discount Code. We'll discuss this more in Step 3) b)
For now, you can add the data-attribute data-s-e-refresh-layout-discount-code to the element which serves as a wrapper for your Layout e.g.
In a Cart Layout, you may also wish to set prices to automatically update when the discount code is added.
You can add the following data-attributes:
data-s-e-live-cart-currency - the element will be filled dynamically with the Cart currency when the Layout refreshes
data-s-e-live-cart-total - the element will be filled dynamically with the updated Cart Total Price.
e.g.
A Discount Code Layout will typically contain:
An input field for the customer to enter a discount code
A button which allows them to submit the code
A button which allows them to remove a code (if perhaps the code is no longer valid and blocking payment).
Feedback to the user regarding successful and unsuccessful attempts to apply their discount code.
Essential HTML, JavaScript and Liquid which controls functionality
Discount Code Layouts will be stored here, inside: layouts/modules/module_14/discount_code
You'll just need a single Liquid file with the same name as your Layout. Optionally, you can use folders to organise Layouts of different types.
If you haven't already, make sure your layout parameter in the Liquid tag matches the name of your Layout File. Any custom folders like 'cart/' should also be added to the layout parameter path.
As there are subtle differences in implementation depending on the type of payment, we've created three different default layouts to help you get started:
"basic_payment/default"
"cart/default"
"subscription/default"
For steps 3 and onwards, you may find it easier to copy and edit the code from the default Layout, but we'll break this down into steps here so you can see all the elements you'll need.
HTML Attributes Explained:
Code
Purpose
Required
data-s-e-discount-code
Attribute should be added to input field
Yes
value="{%- if discount_code != blank -%}{{discount_code}}{%- endif -%}" or {% if discount_code != blank %}value="{{discount_code}}" readonly{% endif -%}
| If a code is already successfully added, it will be autofilled. or Any successful code is autofilled and the current field value is readonly until removed in step b) | One of these |
When adding the 'Apply' button, you can customise how the JavaScript will behave on successful and unsuccessful attempts to add a Discount.
In the examples below, we'll show the basic options recommended for different types of Layout, then explain the full range of options you have for JavaScript behaviour.
Note
We recommend hiding the apply button after the Subscription Order has been created and the Discount Code has been redeemed. See Subscription Specific Instructions.
At this stage, you have a choice about whether you'd like the whole Page to reload after a successful Discount Code is added, or whether you'd like to only reload the Discount Code Layout itself.
We'd strongly recommend that for Layouts on Forms that you set reload: false as this will prevent the User having to re-enter their Form data, and will preserve any custom amount chosen on the Basic Payment Form.
Note also that the value of spend will be different for Basic Payment Forms:
Basic Payment Forms store the spend value in document.querySelector('#s_e_amount').value - as this can be dynamically changed by JavaScript, there is no Liquid value for it.
Cart and Checkout Forms can use the Liquid value: '{{context.exports.cart_base_price.data | json}}'
Subscriptions store the spend in {{spend}}
Option
Required / Default
Notes
spend:
- document.querySelector('#s\_e\_amount').value
- {{context.exports.cart_base_price.data | json}}
- {{spend}}
Required - no default
Basic Payment Forms use spend: document.querySelector('#s_e_amount').value
- as this can be dynamically changed by JavaScript, there is no Liquid value for it.
Cart and Checkout Forms can use the Liquid value:
spend: {{context.exports.cart_base_price.data | json}}
reload: - true - false
default: true
Setting true will refresh the entire Page.
Setting false will refresh the Discount Code Layout only.
We'd strongly recommend that for Layouts on Forms that you set reload: false as this will prevent the User having to re-enter their Form data, and will preserve any custom amount chosen on the Basic Payment Form.
If you select false, you must add the data-attribute data-s-e-refresh-layout-discount-code to the element which wraps around the Layout
see Step 1) b)
error_cb: - custom JavaScript function name (don't call the function yet!) - success_cb: mySuccessFunction
default:
- Depending on the reload option, will reload the Page or Layout
- If reload is false and the Payment Type is Checkout, will update the total Price by running the s_e_cart_update_prices();
For arguments and how to customise your own function, head to step 7.
You can optionally add a button to the Layout which will allow the customer to remove a Discount Code that has already been applied.
The Liquid IF statement helps make sure the button is only displayed if there is a code present to be removed.
The JavaScript function will make the button functional.
Option
Required / Default
Notes
reload: - true - false
default: true
Setting true will refresh the entire Page.
Setting false will refresh the Discount Code Layout only.
We'd strongly recommend that for Layouts on Forms that you set reload: false as this will prevent the User having to re-enter their Form data, and will preserve any custom amount chosen on the Basic Payment Form.
If you select false, you must add the data-attribute data-s-e-refresh-layout-discount-code to the element which wraps around the Layout
see Step 1) b)
success_cb:
Default: Depending on how you set the refresh setting, will refresh the Page or the Layout.
For arguments and how to customise your own function, head to step 8.
Why is this helpful? Although we check Discount Codes are valid when they are added, there are cases where the code is no longer valid by the time the customer reaches the Checkout, for example:
The User may have adjusted the quantity of items in the Cart, causing the spending amount to drop lower than the minimum payment allowed by the Discount Code.
The Code may have been close to expiry.
Adding a "remove" button gives the User a clear way to solve any problems stopping them from completing their purchase.
Note
You cannot remove a Subscription Discount Code after the Subscription Order has been created and the Discount redeemed. See Subscription Specific Instructions.
On Page refresh (or if you've chosen reload: false on Layout refresh), after a successful Code is applied, the following Liquid will explain the minimum spend needed and the discount available.
Depending on where your Layout is, different syntax may be needed to fetch the currency to display.
On Subscription Layouts it is important to know whether or not the Subscription Order has been created, if it has, then the Discount will already be redeemed. The difference in display needs to account for the fact that a redeemed discount is time-limited.
For both situations, we can use the fields inside the discount variable to access details on the Discount.
Before the Subscription Order is Created
At this stage, we can use general details of the discount which is applied, but not yet redeemed, from the this object.
After the Subscription Order is Created and the Discount Redeemed At this stage, we can use details of the actual discount code stored against the Subscription Order. As this is time limited, we may also wish to give details of how much longer the Discount will be active for and the specific Subscription Order will provide these details.
The following code can be used to display the minimum spend needed to keep using the discount:
The following code can be used to display the minimum spend needed to keep using the discount:
It's probably only really necessary to display the minimum spend before the Subscription Order is created and the Discount redeemed. Once the discount is redeemed, the amount spent will be fixed.
This code will display a message if the minimum spend is not set strictly enough and the resulting payment total is below that allowed by the Payment Gateway.
discount_saving_maximum_reached will always return false for Subscriptions and these allow any size of Discount (controlled only by the Partner and Client setting Minimum Spend values on each Discount Code in the Admin.) Therefore, it's not necessary to add this code to a Discount Code Layout for a Subscription.
Read more about the Discount Maximum requirement
discount_code is a variable which contains the Discount Code successfully applied after page refresh
discount_minimum is a variable which contains the minimum spend needed for this Discount Code to be valid.
discount_amount is a variable which stores the calculated saving on the current Cart value.
{{context.exports.cart_currency.data}} will output the currency symbol on Cart and Checkout Layouts
{% include 'ecommerce/basic_payment_currency', format: 'symbol' %} will output the currency symbol on Basic Payment Layouts
`{%- include 'modules/siteglide_ecommerce/ecommerce/price_formatter', price_data: discount_minimum -%}
You can use this Liquid tag to format any Liquid price variable with the correct decimalisation. To use, set theprice_data` parameter to the variable you wish to format.
discount_saving_maximum_reached - if true, the Minimum Amount for the Discount Code has not been set strictly enough and the total Payment Due is below that allowed by the Payment Gateway. You can use this to display a warning message that it has not been possible to apply the full discount.
For Subscriptions, your Layout will inherit the variables of the Layouts it's nested within- meaning it will inherit variables from the Subscription Detail Page, then the Subscription Form. See details of these objects here. e.g. {{this.price.currency_symbol}}
There are lots of reasons why the customer may enter a code but be refused a discount. For example, the code may have expired, or the Cart's value may not be above the minimum spend.
You can start with the JavaScript function below and make your own changes to decide how these errors are displayed to the customer:
As the comments in the example mention, each error returned from a failed discount code will give both a code and a default message. You can choose which one you will use.
Here are the full list:
error.type
error.message
Notes
no_code
Error: This Discount Code does not exist.
expired
Error: This Discount Code has expired.
below_min_spend={min-spend}
Error: This Discount Code has a minimum spend of {min-spend}
used_up
This Discount Code has already been used the maximum number of times.
incorrect_type
Error: This Discount Code does not apply to this kind of payment. It may apply in another area of the Site.
By default, Discount Codes are only redeemable on Cart / Checkout flow. You can change this for an individual code in the Admin using the "Valid on Payment Form Type" field.
If you want to change the message, you can use logic to display different messages using the error code:
Once you've created your function, use the error_cb option in step 3) b) and pass it your function name. e.g. error_cb: myErrorFunction
Setting reload to either true or false in the s_e_cart_discount_code function will both effectively refresh your Discount Code Layout and the Liquid will update with new values, so most use-cases will not need a custom success function. However, if you do need to make changes, you can use the function below as a starting point:
Argument
Example
Purpose
reload default: true
The value of the reload setting passed into the function. Defaults to true for backwards compatibility.
discount
An object containing details of the newly applied discount code.
payment_type
'Checkout' or 'Basic Payment'
Can be used in logic
refreshed_discount_layout
A DOMstring containing the HTML generated by the refreshed Discount Code Layout
This can be used to refresh only the Discount Code Layout, if you choose.
Once you've created your function, use the success_cb option in step 3) b) and pass it your function name. e.g. success_cb: mySuccessFunction
Setting reload to either true or false in the s_e_cart_discount_code function will both effectively refresh your Discount Code Layout and the Liquid will update with new values, so most use-cases will not need a custom success function. However, if you do need to make changes, you can use the function below as a starting point:
Argument
Example
Purpose
reload default: true
The value of the reload setting passed into the function. Defaults to true for backwards compatibility.
payment_type
'Checkout' or 'Basic Payment'
Can be used in logic
refreshed_discount_layout
A DOMstring containing the HTML generated by the refreshed Discount Code Layout
This can be used to refresh only the Discount Code Layout, if you choose.
Once you've created your function, use the success_cb option in step 3) b) and pass it your function name. e.g. success_cb: mySuccessFunction
Note
We recommend for Subscriptions to add some logic checking whether a Subscription Order has already been created and if so, to hide the apply button. This is because once the Subscription Order is created- any Discount Code already applied will be redeemed.
At this point it's not possible to apply or change the Discount Code, only display details of the Order that's active. The purpose of the Form at this point is actually to allow Users to edit their payment details only.
You could add this logic around the whole Layout (as in the default Layout), or just around individual components. For the sake of clarity, in the "subscription/default" Layout, we've opted to wrap the logic around the whole Layout, creating two distinctly separate blocks of Liquid for before and after redemption.
You can also add the statement to check if the Discount will apply to the next invoice or if the Discounted period of months is over.
Shipping Options let customers choose how fast they'd like eCommerce Products delivered and prices are added onto the price at Checkout.
Shipping Options let customers choose how fast they'd like eCommerce Products delivered and prices are added onto the price at Checkout.
Here's what it does:
Admin Users can add and remove Shipping Options e.g. "Free Delivery", "Premium"
You can output the Shipping Options in your Cart with their own sub-layout
Once chosen, the Shipping Option will be saved alongside the customer's Cart and the price of shipping will be added to the total price displayed.
When an Order is made, the customer will pay for the price of Shipping and the option chosen will be displayed against their Order in the Admin.
You can add, edit and remove Shipping Options in the Admin. Go to ECOMMERCE/Shipping Options in the left-hand menu.
The Options are designed to be included in an HTML Select box in the Cart.
You'll need to add the following Liquid where in your Cart you want to include your Shipping sub-layout:
The only parameter you'll need to include is your Layout.
You won't need to do anything else to implement this feature. Any options selected by the customer will have their prices added to the price total in Checkout.
Include your Custom Layout alongside my_layout:
layouts
modules
module_14 (eCommerce)
shipping_option
siteglide_example.liquid
my_layout.liquid
Here's an example:
Some key points to note from the example:
You'll need to put the onchange attribute on the HTML Select element itself and use the Siteglide function.
You'll need to loop over the shipping_options array we've created for you to build your HTML Option elements.
You can use a Liquid if statement to mark an option as the Shipping Option currently selected by the User: `
`
Discount Codes can cause the payment total due to be smaller than your Client may wish- or even 0.
When accepting payments, most Clients won't want to handle very small payments e.g. less then 50 cents.
Stripe's payment gateway will, in fact, refuse to process payments smaller than its minimum payment amounts, which will lead to bad User Experience as Payments will fail.
PayPal will accept these small payments, but will charge the Client potentially more than they make on the transaction.
This Article will explain the two main solutions to these small charges:
Recommended - The Agency and Client can set Minimum Spend against each discount Code
Fallback - While applying discounts, Siteglide rounds payments up to an absolute minimum the Payment Gateway will accept.
In the future, we plan to change the flow so that Siteglide will accept 100% discounts in the Checkout by skipping the Payment step. For now- we'll recommend alternatives if you need this functionality.
In the following section, we'll refer to the "minimum desired spend". By this, we mean either:
The lowest value order your Client is willing to accept (bearing in mind they still need to pay the charges due to the Payment Gateway on this Order).
If using Stripe, this will be at least 50 of your currency's lowest denomination e.g. cents
If using PayPal, this will be at least 1 of your currency's lowest denomination e.g. cents.
The main method the Agency and Client have at their disposal to prevent this is the Minimum Spend field when creating or editing their Discount Codes.
This field should be set up to make sure that if it's value has the discount applied, the total price due would still exceed the minimum desired spend.
E.g.
For percentage discounts - you should check that if the percentage discount is applied to the value in "minimum spend" it won't leave a total which is lower than the minimum desired spend:
e.g. In this example, let's assume it's only economically viable for the Client to accept spends of 50 cents or more- this is their "Desired Minimum Spend" (your Client's may well be different!).
In the screenshot below- even with a 90% discount, the minimum spend is high enough to avoid excessively small charges:
$5.00 multiplied by 90 divided by 100 is a saving of $4.50.
$5 dollars with a $4.50 dollar discount leaves a remaining payment due of $0.50.
For value discounts the calculation is simpler - "Minimum spend" minus "value" should be greater than minimum desired spend.
E.g. For a $9.50 discount, you need a "Minimum Spend" of $10 to prevent discounts from allowing a spend below $0.50.
As explained below, Siteglide will take its own steps to avoid very small charges, but using the Minimum Spend field is the easiest way to make these limits clear to Users, improving their experience. It also allows the Client to decide if their minimum desired spend is greater than the Payment Gateway's value.
How Siteglide Handles Small Charges on Basic Payment Forms and Checkout While applying discounts, Siteglide will automatically check if the total price due is below the absolute minimum needed for the Payment Gateway to accept the Payment.
If this is the case, Siteglide will automatically adjust the total price due to:
For Stripe, 50 of your currency's lowest denomination e.g. cents For PayPal, 1 of your currency's lowest denomination e.g. cents This will display on the Cart, and be the total amount actually charged to the User's Card.
Again, setting a reasonable Minimum Spend is the preferable solution to this issue, but in the case that Siteglide does need to fall-back and round charges up to the minimum payment, you can inform the Users of this with a message.
This code can be used inside your Discount Code Layout:
Stripe Subscriptions handle this problem differently. The variable discount_saving_maximum_reached will always return false for Subscriptions discounts, as we will never manually cap the amount of Discount for these kinds of payment.
Firstly, Subscriptions allow you to give 100% discounts- this effectively creates one form of "free trial".
Secondly, if Stripe judge a Subscription invoice to be for an un-economically small sum, they will carry that charge over to the next invoice. In the same way, if the discount gives a greater reduction in cost than the spend, the customer will receive credit in the Stripe account, which will be carried over into the next invoice. If you do not wish for this behaviour, see Setting Minimum Spend above!
Currently, it is not possible to offer 100% discounts on Checkout using Stripe or PayPal.
In the future, we intend to better support 100% discounted Orders by completing the Order without carrying out a Payment, however, we expect values between 0 and the Payment Gateway's minimum to continue to be rounded up.
The following alternative Form types do currently allow Users to complete them with Payments of 0:
Our Quote Only feature for these customers- as this does allow Orders to be created without any charges being made- meaning the Client will not be charged. Our Basic Payment Form with Stripe will already skip payment if the amount due is exactly zero and the Minimum payment value field attached to the Form in Admin is also 0.
Whilst editing a Product, navigate to the "Location" tab.
Here you can manage and edit the address and longitude/latitude fields.
Using one of the two methods:
Search for an Address - Search for an address that you'd like to use, and select from the results in the dropdown
Or
Address - Manually enter the address in text form, and
Longitude/Latitude - GeoJSON - enter the address as coordinates [long, lat]
Once you have done this, click save; and head over to our Location docs to set this up.
Customise the "Add to Cart" button to keep customers on the Page or redirect them straight to the Checkout Flow with a "Buy Now" button.
This Article assumes you've already:
Added a "cart_add" button to a Layout.
If you've not already done this, you can read the following Articles to learn more:
Although we've had an "Add to Cart" button for a while now, we've recently added the ability to add a custom Layout for this component.
This will allow you to:
Change the style of the button
Change the style of the button when the Product is out of stock
Change the behaviour of JavaScript when adding to the Cart is successful
You can add a Layout to the Cart Add Button by adding a component_layout parameter to the Liquid:
This feature is backwards compatible, so if you have a Site which does not specify a Layout for these buttons, the default Layout will be chosen automatically- and this will be identical to the style and behaviour you are used to.
We store these Layout files at the following path: layouts/modules/module_14/components/add_to_cart_button/my_custom_layout.liquid
You can either edit the default Layout or create your own by right-clicking on the "my_custom_layout" folder.
Looking at the default layout, you can see that it has some key characteristics you may wish to keep in your new Layout:
Checking if the Product is in stock
Running the JavaScript function
You can use a Liquid If Statement to check if the Product is in stock.
To achieve the functionality of adding a Product to the Cart, you'll need to run a JavaScript function when the button is clicked. The first argument is mandatory- you must pass in the ID of the Product using Liquid: onclick="s_e_cart_add({{this.id}})"
The second argument in the JavaScript function is optional. If you like, you can add in the name of a function you've defined on your Page. This will run instead of the default "alert" message when a Product is successfully added:
As in the example above, you can use this to add a different alert message with a different message. Or you could run any other JavaScript you like instead.
Remember, you also have access to the function: s_e_live_cart_update()which will return the number of Items now in the Cart. You could incorporate this number into the message.
Some eCommerce Sites require a "Buy Now" button which adds the Product to the Cart and then sends them directly into the Checkout Flow. You can turn your "Add to Cart" button into a "Buy Now" button using customisation options:
Product Attribute Layouts allow you to customise the way that you present users with a choice of which variation of a Product they want.
Product Attribute Layouts allow you to customise the way that you present users with a choice of which variation of a Product they want.
You have created Products in the Admin
You have created a Product Detail View
This Tutorial will show you how to use Attributes to let Users pick Variants on the Product's automatically-generated Detail Page.
It will cover how to:
Find where Product layouts are stored on Code Editor
Develop a my_attribute_layout.liquid file
Allow the User to select Attribute Options before adding to Cart
In SITE MANAGER/Code Editor, the folder structure for product attributes layouts is as below:
See a more complete Cart & Checkout Folder Structure here:
To create a new set of Product layouts- create your folder at the level of "name_of_my_layout". Inside that, the folders and files should be created as shown above.
If you are making a layout where you know exactly which Attribute a Product has, you can include an Attribute layout to display an Attribute with a given name: detail/item.liquid (including a single Attribute)
If your Products have multiple Attributes, or you want to write code which can dynamically display any Attribute given to the Product, you can use liquid to loop over all Attributes. We've recently updated this example to be much simpler and easier to use.
Loop over all Attribute Options
Check if the Attribute is enabled
If so, include the relevant Attribute layout, dynamically filling in the "name" parameter.
detail/item.liquid -- (looping over all Attributes linked to this Product)
There is no need to create a wrapper file for Attributes, as they are already included inside an item.liquid file. Your Attribute layout can be given a name of your choice. Different Attributes for the same Product may use different Attribute layouts, e.g. "Colour" may include colour swatches.
You can output the name of the Attribute that the current Layout displays: {{this_attribute.properties.name}}
The following liquid outputs an array of the options that have been created for this Attribute: {{product_attribute_options}}
You can loop over this array with the following liquid code, (where the example has the variable "option", you could choose any variable name):
To get the full benefits of Attribute functionality, including the user's choice of Attribute affecting what is added to the Cart, the data-attributes and function calls in the example should be included:
As you can see in the example, inside the loop it is possible to access the specific Attribute Option in this iteration via the "option" variable you created when setting up the loop, but you can also still access the "this" object specific to the Detail Layout that wraps around and includes the Attribute Layout. See the Product Layout Liquid Reference to see the fields available in the "this" object and those specific to Attributes and Attribute Options.
Importing Products enables you to add Products in bulk at the same time. This is handy when you have many Products that you'd like to add or you'd like to edit these items in mass. Exporting enables you to generate a copy of your items and download this to your computer.
Firstly, navigate to your Products.
Above your list of Products, you'll see two blue buttons that say "Import" and "Export".
You can import data to Products, either by creating your own CSV file using the correct column headers or by downloading the import template and populating it with data. Click "Import" to redirect you to an area where you have two tabs, "Prepare" and "Start Import".
Clicking on "Prepare" will enable you to create your own CSV file using the correct column headers or by downloading the import template and populating it with data.
Click on "Start Import" when you have a CSV file prepared, and click "Select CSV" to choose your file and begin importing into Siteglide.
A success message will show in the top right hand corner when this process has been completed for you. You can also head to Site Manager > Import Logs, to find a log of this CSV import.
To export your Products, click the blue button that says "Export". A background data export process is then triggered, and you will receive an email when the data is ready for you to collect.
You can track progress of all your exports via Site Manager > Export Logs. Here you can see all exports that have been triggered, and download the resulting data.
Use the s_e_cart_inventory_check function to check the stock levels of items in the Cart and take appropriate action before Checkout.
To give the customer the best experience and avoid disappointment, you'll want to make them aware of any problems with their Order as soon as possible.
Using the s_e_cart_inventory_check function in the Cart Layout, you can check each row in the current Cart to check that the required quantity is available. Items will remain in the Cart, but a warning message will display.
The function will also check for any Products which have been been disabled, expired or have a selected Attribute which has been disabled. These products will be automatically removed from the Cart and a warning message will be displayed to explain this.
One way to use this function is as immediate feedback when the User loads the Page or adjusts quantity in their Cart. Alternatively, you can run the function on the "Checkout" button press, to run a final check and redirect the User to the Checkout if successful.
In order for the JavaScript to read the up-to-date quantities in the Cart, you'll need to add the following attributes to your Layouts:
In the item.liquid file of your Cart Layout, add data-s-e-cart-id="{{this.cart_data.cart_id}}" to the highest level element.
In the item.liquid file of your Cart Layout, check that the <input> element containing the up to date quantity for this row has the name attribute with the value quantity. e.g. <input name="quantity">
Add the s_e_cart_inventory_check({}) function - we'll document which Event Listeners and arguments can be used later in this Article.
A common starting point would be to add the function to a button on a click event e.g.
If any Products in the Cart are no longer 'enabled' or have been deleted- or if the Product is enabled, but one of the selected Attributes is not, we'll automatically remove these rows from the Cart when the function is run.
Adding the following data-attribute to an element will display a message explaining this when it happens: data-s-e-cart-has-removed-products
Meanwhile you can use the following Liquid to fetch the same message. This is useful if the Page is refreshed after running the function and you wish to keep the message up:
You can clear the message from the session when you believe the User has had a chance to read it and it will no longer be relevant. (In most cases, you'd display this straight after the Liquid version of the message). We'll clear this automatically if the function is run again without removing any products.
{% session cart_has_removed_products = null %}
We'll explain how you can customize the message itself later in the function options.
The function loops over every row in the Cart, and checks the desired Quantity against available Inventory.
Any disabled, expired or deleted Products are removed from the Cart. So are any Products whose selected Attributes have been disabled or deleted.
An item callback function is then run to handle each remaining row of the Cart, carrying out a different behaviour whether that Item is in stock or not.
If every Item in the Cart is in stock, a success callback function will be run, which may for example optionally redirect the User to the Checkout Page.
As Attributes do not currently have their own Inventory tracking, the function will share out available inventory between all Items in the Cart with the same Product ID.
This means the quantities of each variation of the Product in the Cart will be added up- and if the total is greater than the Global Inventory, all of the rows with this Product ID will return as "out of stock".
Note that where two rows in the Cart list the same Product with different Attributes, the inventory will be shared between them.
The s_e_cart_inventory_check function accepts a single argument containing a settings object. For example:
The table below details the available settings. Leave the setting undefined or remove the setting from the object if you desire to keep default behaviour:
checkout_urlPassing a checkout_url option to the function allows the function to redirect the Page to the Checkout if the inventory check is successful.
If you use a custom success function, this will be available in your parameters. Else, the default success function will use this to redirect the Page.
Default Behaviour Leaving checkout_url undefined means the default Success Function will not redirect to the Checkout.
This option allows you to define a custom callback function which runs against each row in the Cart, telling you whether the Item is in stock or not.
The main function will loop over every row of Items in the Cart. For each Item, the default error function will be run.
Available Parameters
Default Behaviour For all items:
The "max" attribute of the quantity <input> will be adjusted to match the available inventory.
If the item in the row is out of stock:
The class .s-e-cart-out-of-stock is added to the row element with the data-attribute data-s-e-cart-id
The following HTML will be added as a sibling element to the quantity
If the Item in the row is in stock:
The class .s-e-cart-out-of-stock is removed from the row element with the data-attribute data-s-e-cart-id
Previous error message elements with the class 's-e-cart-inventory-warning' in this row will be removed.
The success_cb function runs only if all Cart rows contain a lower quantity than the available inventory, in other words, it runs if all items remaining in the Cart are in stock.
Available Parameters
Default Behaviour
Any .s-e-cart-out-of-stock classes will be removed from all Cart rows
Previous error message elements with the class 's-e-cart-inventory-warning' in all rows will be removed.
If a value for checkout_url is available, the Page will be redirected to the Checkout. Otherwise, it will not refresh the Page.
This can be useful so that as soon as the User arrives at the Cart they can be updated on whether items are in stock. In this example, we don't want to refresh the Page on success because the User has just arrived on the Cart Page and will need time to review:
Example To be added to the wrapper.liquid file:
Example To be added to the item.liquid file:
This is useful if the Customer has clicked the "Checkout" button and you wish to run a final Inventory check first. Here we make use of the checkout_url option and the default Success function:
Example To be added to the wrapper.liquid file:
Manage and edit custom fields that have been added to your Products.
Whilst editing the Products Module Structure, you can add custom fields to add to items.
You can use a variety of field types when creating custom fields, such as:
Text (String) - Single line text field, used for short text inputs.
Text (Multiline) - Multiline text field, used for longer text inputs.
Checkbox - Comma seperated e.g. Checkbox 1, Checkbox 2
Radio Button - Comma seperated e.g. Radio 1, Radio 2
Dropdown (Single Item) - Comma seperated e.g. Option 1, Option 2
Dropdown (Multi Item) - Comma seperated e.g. Option 1, Option 2
Datasource (Single Item) - Access data of an item from a selected WebApp or - Module. Output within Detail, List or Form layouts.
Datasource (Multi Item) - Access data of multiple items from a selected WebApp - or Module. Output within Detail, List or Form layouts.
Image (Single) - Choose an image from File Manager
Image (Array) - Choose multiple images from File Manager
File - Media upload field
Folder - Choose a folder from File Manager
Date - Select a date
Number (Integer) - Choose between a minimum and maximum integer for each item
Number (Float) - Choose between a minimum and maximum float for each item
Boolean - Toggle 'Yes' and 'No'
Custom Array - Comma seperated e.g. Option 1, Option 2
Whilst editing a Product, head to the "Custom Fields" tab.
Here, you can edit the custom fields added to the Module, for each item.
For example, here, there is a custom field added called "test" with the type of File. An image, video, or file can be added here to this item.
The Standard Fields tab is where you can create and edit key information of a Product including: Name, Slug, Release and Expiry Date, and Product Content. You can also enable or disable this Product, and add in an image and a description.
From your list of Products, click the name or the pencil icon to the right-hand side of an existing Product to view the 'Standard Fields' tab.
Here, you can manage and edit key information about your Product, such as:
ID - This is the Product’s unique ID in your site’s database. It is generated automatically when you first save a Product.
External ID - This is a unique ID which is helpful when importing and exporting data. It is generated automatically when you first save a Product. Item Name - The name of your product
Item Slug - This will display at the end of the URL for the Product detail page. (To change the preceding slug, go to eCommerce / Settings in the left-hand menu.)
Weighting - Controls where your product appears in a list view if it is sorted by weighting.
Release Date - The date your Product will become visible on the site. This can be used to plan a Product Launch.
Expiry Date - The date your Product will be discontinued on the site. It is possible to change this after expiry.
Enabled - If toggled to false, the product will be hidden from the site. This is useful if, for example, a Product has been temporarily recalled.
Description - A description of your Product.
Image - It is possible to add further images as custom fields. See custom field sets.
Product Code (SKU) - This is the product code you use within your business (usually on barcodes) to identify this product.
View Item Use the "View" button at the bottom of this area to view this item on the front-end.
For existing Sites, make sure you have updated to the latest version of the eCommerce Module in Portal. For new Sites, you'll need to install the eCommerce Module.
Create some eCommerce Products Set up Product Detail Pages and a Shopping Cart. Try the How to Set Up a Shopping Cart and Guest Checkout Tutorial to learn more about setting this up. To learn more about customising the layouts, visit the following for Product Detail Layouts, Cart Layouts, Liquid reference.
Some companies prefer to give Quotes and generate Leads rather than asking Customers to pay for Products immediately as they order.
A customer generates a quote by:
Adding Products to their Cart
Submitting a Quote Only form
A Client will see the following:
User Submissions are saved in the CRM.
In the CRM the User will have an order with the status: "Quote Only". This will contain all the Products that were in their Cart when they submitted the Form.
You can develop this further with:
Custom Fields and Custom Field Sets allow you to add additional fields to the Form.
Fully-customisable Layouts would allow you to style the - Product Detail Page and Cart differently e.g. hiding Prices, should your project require it.
#Tutorial
In the Payments Tab, toggle on "Use as a payment form" and select "Quote Only" from the dropdown.
First, create your Page or select a Page you've created earlier.
Next, in the Page Builder tab, use Toolbox on the right-hand side to enter the Form. You can find it under eCommerce/Insert Quote Form.
The code should look something like this:
... where the form_id matches your Form's ID.
Add items to your Cart
Navigate to your Page and Submit the Form
Inspect the Order in Admin
Any Orders produced in this process will have the status: "Quote Provided" in Admin. You can click on any email in the "User Email" column to find the CRM entry for the User who submitted this Order.
Note - Generating a Quote in this way will not remove stock from Products' Inventories. However, Products cannot be added to the Basket if they are out of stock.
With customisation, you can make further changes to the Layouts including hiding prices from Product Detail Page and Cart.
For the default Layout, the following Liquid will be taken care of for you, but when building a custom Layout you must make sure it is still included on the line before the submit button:
In the Examples above we started with a Starter Site and copied the code from the default Form Layout into a new Layout, editing the appearance of the Button.
Adding a Product is very similar to adding a WebApp item, but with additional features which are fully integrated into other features of Siteglide eCommerce e.g. Shopping Cart, Checkout and Orders.
Firstly, navigate to your Products.
On the right-hand side above your list of Products, you'll see a blue button that says 'Add New Product', click this and you'll be on your way to creating a new Product.
This will redirect you to 'Standard Fields' page.
Once you have filled out these fields, click 'Save'. Your new Product will then show in your list of Products.
Whilst viewing your list of Products, click on the Product name, or the pencil icon to the right-hand side of any existing Product to take you to the Standard Fields page.
Once you are happy with your edits, click 'Save'.
Whilst editing your Products Module Structure, you can choose to secure items within this Module.
Show in list - show these items in the list view and hiding the detail view behind a 401 page
Hide - hide these items in the list view and hiding the detail view behind a 404 page.
Whilst editing a Product, head to the "Secure Zones" tab.
Here, you can add an existing Secure Zone to this item; if you have no Secure Zones to choose from, you can find out how to create one here.
Once you have added Secure Zones, make sure to click save.
Custom Field Sets are groups of Custom Fields that you can reuse across a range of Siteglide Records including Users, and Products. Head to Site Manager > Custom Field Sets in the left-hand side Menu, to start using.
Once your Custom Field Set has been created, you can assign it to an individual Product. From Standard Fields, navigate to the Custom Field Sets tab. Choose a Custom Field Set that you have created in the drop-down and click Save.
Any Custom Field Sets you have added within the Product will appear as tabs within Custom Field Sets.
You can press the "+" icon at the end of the row to add a new Custom Field Set to this Product. The fields you added previously can now be filled in with Product-specific information.
Set your inventory levels so that Clients can see if stock is running low, and customers cannot purchase an item that is out of stock.
From your Standard Fields tab within a Product, navigate to 'Inventory Control'.
Here, you can set your current stock levels.
Inventory Type :
Global - Applies to the Product Attribute - Inventory is controlled against each individual Attribute Option
None - No inventory control needed
If the chosen type is 'Global', then the following 2 options will show in this same tab:
Display Type (when zero inventory) - This can be controlled on a per-Product basis. Use it to control what happens when a Product is out of stock; you can either hide the product from the shop or display it without accepting orders.
Quantity - Set the quantity you currently have in stock.
Adding your Products to Categories enables visitors to easily navigate and search by Category, and also to output a specific Category.
From your Standard Fields, navigate to the 'Categories' tab.
Within this tab, you see a list of your Categories.
To assign a Product to a Category, click the checkbox next to the Category that you'd like to assign it to and click save.
From here, you can also click 'Manage Categories' to add new Categories and edit the settings. For more information about Categories, click here.
SEO stands for Search Engine Optimisation and is used to help boost your ranking in search results. SEO is incredibly important in attracting new visitors to your site, you'll show higher up in search engines enabling more people to find your site.
When viewing Standard Fields, navigate to the SEO tab.
Within your SEO settings:-
Page Title - Label your Product so that visitors know what it is
Meta Description - Describe your Product so that visitors know what it is about. (When typing in the description field, it will show you a countdown of advised character length.)
In this Article we'll take an in-depth look at the JavaScript needed to update the quantity of items in the Cart Layout.
In this Article we'll take an in depth look at the JavaScript needed to update the Cart when the customer makes changes in the Cart itself.
There are two main flows you can implement:
A second choice is between whether you want to reload the Page to get new values or have our JavaScript function live update them for you.
We'll take a look at the key functions involved and the different ways they can be used within your Layout.
The function will queue a change to the Cart in your local storage, but will not yet confirm the change- unless you explicitly ask it to.
This function is designed to work as a callback function to Events triggered on the element which controls the quantity of items in the currently viewed Cart e.g. it could be added to this element in the Cart Layout item.liquid file.
Like so:
You must pass the arguments 1-3. Argument 4 is optional.
s_e_cart_update_quantity(value, cart_id, token, update_entire_cart);
value - The quantity required of this Item. Usually set to event.target.value if the event was triggered on a target input element.
cart_id - Set to {{this.cart_data.cart_id}} to get the ID referring to the current Item in the item.liquid file.
token - Set to '{{context.authenticity_token}}'
update_entire_cart - Boolean - defaults to false. If you pass true, we'll automatically run the s_e_cart_update() function (see below) as a further callback, confirming the Cart update immediately.
Your choice of which event is watched will affect the User Experience e.g. onkeyup as opposed to onchange.
In conclusion, this function prepares an update to the Cart quantities. In the next section, we'll look at how to apply those changes.
This function will apply the changes in the Cart quantities that you have already queued using the previously discussed s_e_cart_update_quantity();
You can either use this function directly to confirm Cart changes when the User is ready, or indirectly.
If true is passed for the 4th argument of the previously discussed s_e_cart_update_quantity() function, we'll run this function immediately. In this case, you won't need to directly call this function yourself.
Normally this function will be used as a callback to an event triggered on a button on your Cart wrapper.liquid file. E.g.
You must pass the arguments 1-2.
s_e_cart_update(reload, token);
reload - Boolean - true will refresh the Page after updating; false will not. This can also be overridden by passing in a success_cb function.
token - Set to '{{context.authenticity_token}}'
check_inventory_after - Boolean - false - will check inventory stock levels without refreshing the page if set to true.
success_cb - function - s_e_cart_update_cb_default- optionally pass in a callback function which will be called after the cart has finished updating. Your function will be passed the parameters: reload, check_inventory_after - both are Booleans which can be used to modify behaviour or ignored.
falseWhen passing in a false reload argument, you will need to follow additional steps to update the following:
The total quantity
The total price
The price of the line item that was just updated.
-optional- the currency symbol
The s_e_cart_update() function will automatically call the s_e_live_cart_update() function for you- but you'll need to wrap your displayed total in a <span> class with the following data-attribute: <span data-s-e-live-cart-quantity>{{items_in_cart}}</span>
In the wrapper.liquid file, wrap the following element and data-attribute around the Liquid value for the total Cart Price: <span data-s-e-live-cart-total></span>
e.g.
In the item.liquid file for your Cart Layout, wrap the following element and data-attribute around the Liquid value for the item's price: <span data-s-e-live-cart-item-price="{{this.cart_data.cart_id}}"></span>
e.g.
It is necessary to add this item's Cart ID as the attribute's value, in order to locate the correct record within the Cart. This will continue to use the Liquid value on initial Page load, but will now replace it with the live value when needed.
Depending on your HTML structure, you may already be displaying the currency symbol. If the JavaScript is overwriting it, you can add the following HTML to have the JavaScript return it when the function runs: <span data-s-e-live-cart-currency></span>
If you want to allow Users to press the enter button in the quantity input to trigger the event, you may need to modify your wrapper.liquid file so that the Cart is no longer wrapped in a <form> element but a <div> instead. Make sure to adapt your stylesheets if you do this.
We'd recommend against any solution which stops the default submit behaviour on the Cart buttons that should press on focus and enter keypress- as this will negatively impact Accessibility.
If you want Users to be able to instantly update the Cart by changing values in the quantity input, you can run just the s_e_cart_update_quantity(); function with the 4th argument set to true. You may wish to use the onkeyup event for even more instant feedback.
If you want Users to have the option to confirm Cart Quantity updates before they are applied- you'll need to first run s_e_cart_update_quantity() when each input is changed and afterwards run s_e_cart_update() when the User is ready to confirm.
You have read
You have Installed the eCommerce Module
You have installed the Secure Zones Module
Siteglide eCommerce is even more powerful with Secure Zones. With the security of a Secure Zone, you can show your Users more sensitive data about their shopping experience.
Create a Secure Zone which will used by shoppers on your eCommerce site.
Alternatively, you can use a Secure Zone that you have created already.
Find out more about the Secure Zones Module here:
Create a new page which will display a list of Products Users have ordered.
Make a note of the Page slug, because you will want to add this to the Checkout Form’s "Redirect URL" field later.
In CMS / Pages, open the Page you have chosen and open the Details tab. Click the Secure Zones accordion to reveal the "Select a Secure Zone" field.
Click in this to open a drop-down list of your Secure Zones and select the one you wish to be accessed by Users after they complete Checkout.
Make sure your Checkout Form is still in "Test Mode" unless the Site is Live.
Find Forms in the Siteglide Admin’s left-hand side menu under CMS / Forms. Select your checkout Form in the list:
Next, click the "View Form" button to edit:
Select the Secure Zones tag and then click in the Secure Zones Input field to see a dropdown of Secure Zones you have already created.
Select the Secure Zone you want to log your Users in to when they complete the form.
Press the "Save" Button to save your changes. At this point:
Completing the Checkout Form will log Users in to the Secure Zone It will also redirect the Users to the My Orders Page The Users will be allowed to access the My Orders Page, because they are logged into the Secure Zone. Other Users who are not logged in will be unable to access the My Orders Page.
As Orders List Layouts are for showing secure information about Users, they are stored under the following file structure:
module_5/user_orders/name_of_my_layout.liquid
Create a new file in the user_orders folder and give it a name of your choice. Make a note of the name you gave it.
Add the following liquid to your Orders page to output a list of the current logged-in User’s Orders:
The layout parameter should take the name of the list layout you created.
Your layout will have access to the "orders" object. You can loop over each order in the "Order" object with the following liquid (the "order" variable can be renamed to anything you like). For example:
See the orders reference for available fields:
You could add a Secure Zone to other pages related to your eCommerce flow, for example the Cart, in the same way you did with the Orders page. You could redirect the users to a login page when they visit the Cart page and are not logged in.
Learn more about Secure Zones here.
Wondering how to adjust the Product Detail Page based on Category?
As a User navigates to your Product Detail Page, Siteglide will load the Detail View you have specified in your eCommerce Settings. However, it is perfectly possible to customise this based on , using Liquid logic! You can read more about using Categories on the Layout of the WebApp or Module Item they belong to .
In this example, you'd need to know the ID of a category you want to display; this can be found in Admin when you select a category. E.g. let's say we want to display something special when something has the category "Featured" and you know it has an ID of "111111":
Attributes allow you to specify aspects of the Product that the customer can customize as they order. This can change the price and enable customers to choose a variation of this product: for example, to have this in a different colour.
From your Standard Fields in a Product item, navigate to the Attributes tab.
Click the "Add Attribute" button to add a new Attribute. This will appear as a new tab within this area. This can be deleted by clicking "-" next to the name of the Attribute.
Name - This is the name of the Attribute which can vary on this product e.g. "Size" or "Colour". Toggling "Enabled" off will hide this Attribute from view while customers are making Orders.
Image - Choose an image for this Attribute
Add Attribute Option - Clicking this will open a table for the different Attribute Options e.g. if you named your Attribute "Colour", you may choose options of "Red" and "Green".
Press the "Add Attribute Option +" button to add a new row to the Options table. Then fill in the fields below:
Name - Add the name of the option e.g. "Large" or "Green"
Product Code (SKU) - This is the internal Product Code you use in your business for Products with this Attribute Option
Enabled - Unlike the previous enabled toggle, this doesn't affect the whole attribute, but only this particular option
Chargeable Price - This field increases the total Price of the product when this Attribute option is selected e.g. a product costs $10 but a "metallic silver" version costs $2 extra, you would add the value 2 here. A price of 0 would mean that the Attribute does not add to the total Price when selected
Display-only Price - Select a price that you'd like to display only
Inventory Available - If the Product's Inventory Type is 'Attribute' then you can set how many of this Attribute Option are available here
Image - Select an image for this Attribute Option
Delete - Deletes this Attribute Option
Add Pricing to your Products to enable visitors to easily see costs involved with items on your Site.
From your Standard Fields tab of a Product, navigate to the Pricing tab.
Here, you can set and change the price for the Product.
You can set and edit fields for Pricing, such as:
Currency - Currently only one Currency is supported at a time.
Find a full list of supported currencies for Stripe, Paypal, and Authorize.net. Alternatively, you can build your own payment gateway integrations, find out more here.See eCommerce Settings to set your currency.
Chargeable Price - This is the main price that will be added to the total the Customer pays when the Product is added to a basket. It can be modified using Product Attributes.
Display Only Price - Use this to display an extra price such as RRP or Price Before Tax.
Manage and edit your Products to enable detail views, secure this module, and add custom fields.
Above your list of Products, you have the option to "Edit Module Structure".
Here, you can manage and edit information about this Module, such as:
Has detail view? - Choose whether this Module will have a detail view
Slug - Create a slug for this module
Detail Page Template - Choose a page template for this Module to use when in detail view
Detail Layout - Choose a detail layout for this Module to use
Secure Zones - Items can be made secure - Choose to secure these items, and whether to show these in list or hide.
Standard Fields - These are the same fields that can be seen in the Standard Fields tab when editing
Custom Fields - Here you can add, edit and remove custom fields to use for your Module
How to customise the Shopping Cart Layout
You have completed
Cart layouts are stored in the following structure:
See the full Cart & Checkout folder structure here:
The wrapper.liquid file should contain the code for the main section of code that wraps around the loop of Products in the Cart. It should include the following liquid to insert the loop of Products:
<button onclick="s_e_cart_empty(true)">Empty Cart</button>
Of course, this is just an ordinary link. It will need updating with the slug of your Checkout Page: <a href="/checkout>Proceed to checkout</a>
The following reference shows how to output useful data about your Cart as a whole:
` | | Shipping Price Before Tax | `` | | Shipping Price Tax Amount | `` | | Total Item Price | `` | | Total Item Price Before Tax | `` | | Total Item Tax Amount | `` | | Total Price Reduction (due to Discounts) | `` | | Final Total Price Before Tax | `` | | Final Total Tax Amount | `
| | Final Total Price | \{% include 'ecommerce/price_total', format_type: 'formatted' -%} |
` |
If you have added Product Attributes to the Products in the Siteglide Admin, you can also access the cart_product_attributes with the following liquid: {{ context.exports.cart_product_attributes }}
Normally though, Attributes will be handled in the next step- the item.liquid file.
The cart layout will iterate in a loop, outputting the item.liquid file for each line in the customer's cart.
cart_id
Each line in the cart has a cart_id accessible at {{this.cart_data.cart_id}}.
When modifying the cart with JS, this cart_id will be needed.
Multiple lines in the cart may refer to the same product if a different combination of attributes is selected.
There are some additional points to bear in mind when creating a cart layout's item.liquid file:
The s_e_cart_remove function can be used to remove a line from the cart.
If the cart has several lines containing the same product, but with different attributes, only the targeted line and its attributes will be removed.
In this example, the function is called when a button is clicked and Liquid is used to pass the cart ID into the function:
You can optionally pass in a callback function to the third argument to be called after the row has been removed from the cart. In order for this to work, you need to set reload (the first argument) to false.
Note that, after updating this input field, the User will also have to click the "Update Cart" button. Following the link above will lead to a more detailed article.
In order to make sure Users do not increase the quantity of items in their Cart, when the Product is out of stock, you could add a "max" attribute to the quantity input:
Items added to a Cart in Siteglide are not reserved. It is possible for two or more customers to add the last product in stock to their cart at once.
Use Workflow and Autoresponder Emails to send confirmation messages to customers, including a detailed breakdown of their Order.
You have installed eCommerce Module v0.12.0 or later. Checkout to find out how you can install the latest version.
You have set up a Checkout or Quote-only Form. Learn more about Checkout here: or learn more about the Quote-only feature here:
You can now add details of a customer's eCommerce Order to Workflow and Autoresponder transactional emails. Give your Client and the customer peace of mind, as well as valuable records for their safekeeping.
eCommerce Orders are created by Checkout and Quote-only Forms.
Within the email, you can also access any fields that were submitted along with the original Form. Learn more here:
Add the following Liquid tag to include the details of the customer's most recent Order:
In an email notification, this will always be based on the Form that triggered the email. Only an Order generated by that Form submission will be visible in this context. This means that Autoresponder emails will always show Form Submission data from the correct User.
You can use an existing Layout, or create a new one in this File Structure: layouts/modules/module_14/order/my_layout/ Within your Layout folder, you'll need:
An item.liquid and a wrapper.liquid file
Inside your order_details layout you'll find an item.liquid and wrapper.liquid file.
You can use the wrapper.liquid file to build the main HTML structure of your Layout. When you're ready to include the Order Details, use the following Liquid to include the item.liquid file:
The item.liquid file will have access to the This object, which will contain details about the Order:{{this}}
Orders involve several different types of models and can be complex. When developing you will need to use loops to take into account each different eCommerce element which may be a part of the Order.
When developing a custom layout, it may be helpful to refer to the default Layout.
Looping over Products This loop will find any Products in the Order and loop over them.
Looping over Products and accessing Fields Within a Product Loop, you can access the fields associated with that Product.
{{ product.product_name }}
{{ product.quantity }}
{{ product.product_code }}
{{ product.currency_symbol }}
{{ product.price }}
Looping over Products, then looping over Attributes
Outputting Shipping Method The following fields are available relating to the Shipping Method:
this['Shipping Method Name']
this['Currency Symbol']
this['Shipping Method Price']
{%- include 'modules/siteglide_ecommerce/ecommerce/price_formatter', price_data: this['Shipping Method Price'] -%} - a formatted Shipping Price
Example of only including Shipping Information if it was set:
Outputting Totals
{{ this['Currency Symbol'] }}
this['Total Price']
{%- include 'modules/siteglide_ecommerce/ecommerce/price_formatter', price_data: this['Total Price'] -%} - A formatted total price
Within the Orders Detail Layout you will have access to the orders array variable. To display a list of items in the single order, you should add a Liquid loop like this:
Within the loop, you can use properties of the object within the loop iteration as detailed in the table:
This is useful if you want the Inventory checked immediately after the User changes the desired quantity. In the example we want to time this function straight after the . Instead of running the function directly then, we'll set the check_inventory_after option against the s_e_cart_update_quantity function.
You can use our to get the new total quantity of items in the Cart.
The explained how to create a Checkout Form. Here we will modify this form so that it also either signs in a User or logs them in, depending on their current status.
In the "Redirect URL" field add your Orders , preceded by a forward slash. E.g. /my-orders
has an out-of-the-box Orders List design ready for you in a Bootstrap 5 or Tailwind version.
Building the Cart's item.liquid file is similar to building an item.liquid layout file for a Product List View. Learn more about the available fields .
See the full Article on .
Inside your email notification file, you'll have access to the Form object: {{form.properties}} This contains the fields submitted with the Form. Learn more here: You'll still have access to these fields throughout the Order Details Layouts.
Use Case
Step 1)
Step 2)
Change Cart Quantity with a single action
Run the s_e_cart_update_quantity() function with the 4th argument set to true
Change Cart Quantity by: 1) Making a change 2) Confirming the change
Run the s_e_cart_update_quantity() function with the 4th argument set to false
Run the s_e_cart_update() function to confirm
Setting key
Example
Optional
checkout_url:
'/checkout'
Yes
item_cb:
exampleItemFunctionName
Yes
success_cb:
exampleSuccessFunctionName
Yes
no_longer_available_message:
'Sorry, some Products in your Cart have been removed because they are no longer for sale.'
Yes Note: the attribute data-s-e-cart-has-removed-products must be added to an element in the Cart Layout in order to display the message when needed.
Number
Parameter
Purpose
Example
1st
element
A DOM element referencing the element with the data-attribute data-s-e-cart-id where not enough quantity is available. You can target elements inside this when adding and removing error messages.
<tr data-s-e-cart-id="{{this.cart_data.cart_id}}"></tr>
2nd
in_stock
A Boolean telling you if this Item is in stock or not. If true, you may wish to remove previously added error messages. If false, you should display the error message to the User.
true or false
3rd
quantity
An Integer for the quantity desired by the customer.
5
4th
inventory
An Integer for the inventory available for this Product.
4
5th
name
The name of the Product in this row.
"T-Shirt"
Number
Parameter
Purpose
Example
1st
checkout_url
A String containing the value of checkout_url originally passed as an option to the main function. Can be used to redirect to the Cart, if available.
'/checkout'
Field Name
Liquid Tag
Total Quantity
{{context.exports.cart_total_quantity.data}}
Shipping Price
`
Order ID
{{order.id}}
The unique ID of the order
Order URL
{{order.slug}}
The unique slug of the order
Order Full URL
{{order.full_slug}}
The unique slug of the order including Order Slug
User ID
{{order.user_id}}
The unique ID of the Current User
User Email
{{order.email}}
The email address of the User who completed the Order
Status
{{order.status}}
The status of the Order
Price
{{order.price}}
The Price paid for the Order as a decimal
Currency
{{order.currency}}
The currency the Order was made in
Offer your customers better prices when they purchase in bulk. This feature lets you define as many levels of Volume Pricing as you like.
Volume Pricing allows your Client to offer better prices to customers who buy products in greater quantities.
Let's say for example a product normally costs £5, but to encourage larger sales , the following table of prices are available:
Quantity Threshold
Price
1
£5
100
£4
1000
£3.50
If the customer orders 105 items, they will have passed the quantity threshold of 100, so will have access to the price of £4 per product for all 105 items. They did not order a high enough quantity to get the best available price.
At the present, when two alternate versions of the same Product with different attributes are present in the Cart, both their quantities will be added up and counted towards the Volume Pricing Calculation.
There is no need to implement any front-end code in order to start using Volume Pricing. All you need to do is define the pricing in the Admin against individual products and those prices will become available.
You may wish Front End to dynamically display the available prices for a product. To do so, you can loop over each pricing threshold and display the prices in a table, list or format of your choice.
Inside the Product List/ Detail Page item.liquid file, you'll have access to the following fields:
Field Name / Liquid Tag
Example
Notes
{{this['Volume pricing Enabled']}}
true
Contains a boolean. If false, normal pricing will be used.
{{this['Volume Pricing']}}
{ "100": 400, "1000": 350}
Contains a JSON object of the currency thresholds for this product set in Admin. When stored in the database, this is organised by currency, but front-end we'll fetch the relevant currency for you.
When looping over an object like this['Volume Pricing'], .first allows you to access the key (here the quantity threshold) and .last allows you to access the value (here the price).
First though, we use logic in the first line to check if the pricing has been enabled:
Inside the Order Confirmation Email, you'll have access to the following relevant fields.
Field Name / Liquid Tag
Example
Notes
{{product.volume_pricing_original_price}}
60.00
A formatted price representing the price of the row, had the better volume price not been applied.
{{product.volume_pricing_threshold_reached}}
4
The highest quantity threshold reached. If no volume pricing was accessed, this will have the value nil. You can use it in logic to check if Volume Pricing has been applied - see code example below.
{{product.currency_symbol}}
£
{{product.price}}
19.00
This formatted price shows the actual price of the order row. This will either be the default price, or a volume price if available.
The following example shows how the Volume Pricing can be shown inside a <td> element in an Order Confirmation Email.
See the Order Confirmation Email documentation for more.
Help customers find regular purchases and favourite products with the reorder button.
Help customers find regular purchases and favourite products with the reorder button. The button can be added to a user_orders Layout or any other Layout where you have access to an Order ID.
For this reorder feature to work, the User:
Must be logged in
Must have been logged in when they originally made the Order
The feature fetches all Products from that Order and adds those that are still available to the Cart. This gives the User a chance to review and adjust quantities before Checkout.
A message can also be displayed to the User to detail any Products from that previous Order which are no longer available. Though, this is only possible where an Order still exists in the database and has not been deleted.
The following Liquid will output the reorder button:
Parameters:
layout
order_id
The button can be added in any Liquid Layout, but you'll need to have access to the ID for an Order belonging to that User- which is most easily available in the User Orders Layout or the Order Details Layout (note that a User can't be logged in when reading an email, so this feature will not work from an Order Details Layout in an email).
In the User Orders Layout, the exact Liquid for the ID will depend on the variable you've set in the loop. In the following example, the variable assigned to each iteration of the loop is this. so the Order ID is available inside the loop as this.id.
The button will only work if the User is logged in, so you may wish to add the following logic to an Order Details Layout to make sure the User is logged in before displaying:
Adding the button will load a small button layout. You can find the default Layout or create a custom Layout at the following path: layouts/modules/module_14/components/reorder_button/my_layout_name.liquid
Adding the function The styling of the button is completely up to you. To carry out its main functionality, the button requires an event to be attached to it which will run a JavaScript function:
The function takes a single argument containing an options object. The available arguments are as follows:
Option
Purpose
Example/ Default
Required?
order_id:
The Order ID to be looked up and added to Cart
'{{order_id}}'
Yes
token:
Access token from Liquid
'{{token}}'
Yes
cart_url:
Cart URL for redirection after successful result
'/cart'
Yes
error_cb:
Custom Error Function Name
error
Optional
success_cb
Custom Success Function Name
success
Optional
Adding a Custom Error Function The Custom Error function will be called in the following circumstances (the table also shows the value of the "error" parameter passed back when this occurs):
Error
error** parameter value**
Order found but does not belong to this User, or User is not logged in.
"Unauthorized."
Order does not exist
"Order was not found."
All associated products are disabled, expired, unreleased or deleted.
"Order was found, but no products were available."
Any other error
"Could not reorder."
Parameters returned:
error - see above
reorder_unavailable_products - an object containing all Products which could not be added to the Cart from the Order. Looping over this object can allow you to display the ID and/or name of these Products. Expiry dates are also provided, where they exist, for context.
The default error behaviour is to display an "alert" containing the error message.
Adding a Custom Success Function If you add a Custom Success Function, you must add a Custom Error Function.
The custom success function will run if an Order was successfully found and at least one Product was successfully added to the Cart. Not all Products related to the Order may have been available.
Parameters returned:
cart_url - The URL of the Cart that you passed into the function originally.
reorder_unavailable_products - An Object containing the Products which are no longer available and couldn't be added to the Cart.
reorder_added- an integer representing the number of unique products with either a different Product ID or the same Product ID but different Attributes, that were successfully added to Cart. The number ignores the actual quantity of each product added and is more useful as a measure of successfully added rows.
The default success behaviour is to re-direct the Page to the Cart URL.
You can choose whether to display a message about the unsuccessful items before that, using JavaScript or display that information via Liquid when the User arrives at the Cart.
Successfully added Products are automatically added to the User's Cart. When they arrive at their Cart Page- they can review the quantities and Check Out when ready.
The following Liquid tags can be used to either confirm the Order ID which has been added to the Cart, or present a detailed breakdown of the Products which were not successfully added; this is an alternative to showing this information in the Custom Success Function.
Liquid Tag
Purpose
Example Output
{{context.session.reorder_added_to_cart}}
The ID of the ( at least partially ) successfully added Order. This can be used in Logic to decide whether to display feedback at all- as if it equals blank, there will be no recent reorder.
"345"
{{context.session.reorder_unavailable_products}}
An Object containing details on unsuccessful Products- if there were any. This contains the same information returned to the Custom JavaScript Callback Functions.
{"173":{"product_id":"173","name":"Classical Summer Album","expiry_date":"2145916800"}}
{% for this in context.session.reorder_unavailable_products %} {{this[0]}} {% endfor %}
By looping over the unavailable Products and accessing the [0] index, you can access their key: - the Product ID.
"123"
{% for this in context.session.reorder_unavailable_products %} {{this[1].name}} {{this[1].expiry_date}} {{this[1].expiry_date | date: "%d/%m/%Y" }} {% endfor %}
By looping over the unavailable Products and accessing the [1] index, you can access their fields: - the Name - the expiry date of the Product - the expiry date of the Product (formatted)
- "Classical Summer" - "2145916800" - "01/11/2020"
{% session reorder_unavailable_products = null %}
Clear the reorder_unavailable_products data from the session This would only happen automatically if another Order is reordered, the Cart is emptied, or Checkout is completed.
{% session reorder_added_to_cart = null %}
Clear the reorder_added_to_cart data from the session. This would only happen automatically if another Order is reordered, the Cart is emptied, or Checkout is completed.
The above Liquid tags are accessing the User's session. This means they are temporary messages for that User. Each time an order is reordered the old message will be replaced.
This example will, if an Order was successfully reordered -display a message to Users confirming the Order ID which was reordered. If any Products were not available, these are displayed in a table. Finally, the session is cleared, so the User only sees this once.
In this tutorial we'll be using both Categories and Collections, if you're unfamiliar with either of these we'd recommend refreshing your memory:
Often in eCommerce, you will have Products that are similar to one another. e.g. You might have a brand of chocolate with certain different flavours available. Or you might have different sized packs.
On Siteglide, we provide the Attributes feature- which allows you to merge these multiple varieties into a single Product with options. Users choose which Attributes to select as they add the Product to the Cart, and the Price can be adjusted accordingly. outputting them as options Front End.
Adobe Business Catalyst, on the other hand, also allowed Users to "group" these similar Products instead. Product Grouping treated the Product variations as separate entities which could show up in Product Lists independently. Meanwhile, the Product Detail Page for one variation would display a list of alternate Products in the group, allowing you to switch to view the different information. Many partners have expressed an interest in re-creating this Product Grouping feature on their Siteglide Site.
There are several ways to achieve this:
Use Categories to group the Products
Use Datasources to build a relationship between a Product and similar Products in the Group
Convert an existing Product Grouping setup to use single Products with Attributes instead.
In this Article, we'll demonstrate how to group the products using Categories.
First, create a Category that will link the products together.
If you will also have some non-grouped Products, you may wish to create a "Product Groups" Category as well as a parent to organise all your product grouping Categories inside- bellow I'll explain how you can ensure that only Categories within the parent Category are used.
Here's how I've structured my Categories, "Chocolate" and "Crisps" each represent separate groups of Products, the parent Category "Product-group" will be used to identify them as Product grouping Categories, allowing you to keep them separate from the other Categories your Products may have:
Now let's look at how we can ensure only the Categories within "Product-group" are used when outputting our related Products. First I assign an object containing all the Categories on my Site (this gives us access to all the Categories fields, rather than just the ID):
Next loop over all of our Products categories, at each iteration we'll store the "full_slug" of the Category (this will include the parent Categories slug, which we can use to check the Category is being used for Product grouping).
Note: "this" contains one of the Category IDs assigned to our Product, we then use that ID to find all of the Categories details in "context.exports.categories.items":
We've now created an array of all the individual "parameters" in our "full_slug" field, next we'll loop over this and check none of the parameters equal "product-group"- if they do then we know that Category is being used for Product Grouping and store its ID. Add this code to the for loop above:
This will check all of the parameters, make sure you replace "product-group" with whichever slug your wrapping Category is using. If it is a Product grouping Category, we store the ID in the variable "group_category". We'll use this ID later to output our Related Products.
Now add all the related Products to this Category. You can do this in the Categories tab when editing your Product. In this example- we'll be selecting the "Crisps" Category to add to our "Ready Salted" flavour Product.
Repeat step 2 for all the Products you'd like to be linked together.
On the Detail Page of each Product in the group, we'll next need to List the other Products in the group.
There are now two ways we could output the related Products. You can choose one of the following methods:
Include the other Products in group by nesting a filtered Product List Layout inside the Product Detail Layout.
Keep all the code tidy inside the Detail Layout using a Collection to fetch the same data.
We'll demonstrate how you can use method 3) b).
If you'd like to use a separate Layout to output your products, add this include to the Layout you're working in:
...where group_category contains the ID of the category containing the related Products. In your chosen Layout, you would be able to add Content regarding the Related Products.
Now we know which Products are related to one another, we can output them. For this demo, I'll be outputting them within the Detail Layout.
To do this we'll use a Collection (read more here: Collections) which will be filtered by the parameter "category_id", meaning only items within the specified category are included (please follow step 1 for instructions on how we can do this dynamically).
If you're in a Detail layout, make sure to include the type: 'list' parameter. Also, ensure collection: 'true' is added to the include, along with your Category ID.
The Collection will call all the specified items into {{context.exports}}, to save us writing the whole path to the item each time we output something, we'll store them in an Object:
{% assign items = context.exports['module_14/product'].data.result.items %}
Now loop over the object, at each iteration we'll check that the ID doesn't equal the ID of the Product being displayed on the Detail Page (this will stop the Product on the Detail page being displayed as related). We'll use {{this.id}} to do this:
Many partners who have expressed interest in the Product Grouping feature have also requested a demonstration of how to include a dropdown menu which allows easy access to links to other products in the Product group.
As always when using custom JavaScript, you may wish to adjust the simplified examples in order to add in improvements to SEO and accessibility.
For this demo, I've chosen to output my Related Products using <select> & <option>, and some Javascript that will redirect the Page.
This will output ---Select alternative Product--- as the placeholder for the options, then will loop over all the items in the Object we've just created, each iteration will output another <option> where the value contains a relative link to that Products Detail Page.
Lastly, we'll need to add the Javascript for the "handleOption" function above, this will simply redirect to the slug within the options value attribute:
If you used the method 3) b) above, you'll need to move some of the code from 4) a) inside the products Layout.
Make sure your Wrapper still includes the items inside the <select> element:
The HTML and Liquid for each option should then be included inside the item.liquid file: <option value="/{{item['module_slug']}}/{{item['slug']}}">{{item.name}}</option>
As above, you'll need to include a JavaScript function to make the dropdown functional.
Alright, that's everything we need to link our Products. Here is a screenshot of the solution:
Open Graphs are what appears when you share a link to your Product.
You see the title, a description, what it is - whether it's a website or an article. Open Graphs help your Site seem more appealing to others to encourage clicking through. Open Graph settings are where you can customize what is shared when you send a link to your Product.
Where can you find Open Graph Settings For Your Product? From your Standard Fields navigate to the SEO tab, scrolling down below the SEO Settings, you will find Open Graph Settings.
Give your Open Graph a title, keep it relevant so that people know what it's for.
A preferred URL for this.
An image to make your Open Graph look more appealing.
A description to encourage people to click through to your Site.
Choose an Open Graph type, this describes the type of content that is being shared. The drop-down menu consists of: article, book, profile and website.
Choose a Twitter card type, this also describes the type of content that is being shared. The drop-down menu consists of : app, player, summary, and summary_large_image.

Mostly Checkout Form Layouts are developed in the same way as , with a few differences included below:
This liquid include used to output payment fields in a checkout form.
You should include this in the layout file for a checkout form at the position in the layout where you would expect the card payment elements to appear.
Outputting 1 payment gateway option
This will output the Payment Gateway that you most recently updated in Siteglide Admin.
Outputting multiple payment gateway options
This will output the Payment Gateway with the ID you select. When outputting by ID, you should select which is the default option.
When using Stripe as your Payment Gateway, the default payment method option is locked to 'Card Only' (type: 'card_only').
Alternatively you can show other payment method options such as Klarna or Apple Pay. You can control exactly which options show by configuring them in your Stripe Dashboard here -> https://dashboard.stripe.com/settings/payment_methods Then you need to update your code to include the 'type' parameter with a value of 'payment' as follows:
Once you've added multiple Payment Gateways to your form using the include above, you can add JavaScript to switch between them on the client side:
You have installed the eCommerce Module
You have set up a Payment Gateway
You have added Products to the database
You have set up a Product List View
You have set up Product Detail Pages
Using PayPal as a Payment Gateway? There are additional setup instructions .
The Siteglide Ecommerce Module makes it easy to set up a secure and reliable Shopping Cart and Checkout flow. As usual, you can customise your layouts at every step.
In this tutorial, we will show you how to create the simplest Cart and Checkout flow- the Guest Checkout. Users can buy Products without having to sign in, but their details are stored in the CRM so the Site Owner can send them their Products.
In future tutorials we will show how to extend this with the following features:
Use the Secure Zone Module to Sign Up and Login users at different stages of their shopping experience.
Use Product Attributes to add Products with variations to your shopping Cart.
Use Categories to Create Pages which display different lists of Products.
Add a Cart Summary to the Header
Make sure your Product Detail pages have an add to Cart Button in their layout’s item.liquid file.
This liquid include tag will add the "Add to Cart" Button:
This needs to be in the item.liquid file to work, because this will have access to the correct data for this Product.
Create a new Page for your Cart and use liquid to include the Cart.
(Note- the Cart does not need to be on it’s own page, but this is the easiest place to start.)
Use this liquid to include the Cart layout in your page.
Use the layout parameter to select the folder which contains the wrapper.liquid and the item.liquid file you would like to use for your layout. For now, you can use the "cart" layout which is included in the Ecommerce Module.
Use the remove_default_css parameter to choose if you want to remove siteglide_example.css from output or not.
This will store a paying User against the CRM and submit their payment details securely via your chosen Payment Gateway.
You will need to add the following information when creating your form:
Form Name: e.g. Checkout Form
Redirect URL - This is the relative URL you want a user to be redirected to after submission of payment details e.g. a confirmation page.
In the payments tab, toggle "Use as a payment form?" to on
Payment Form Type will appear under the payments tab. Select "Standard Checkout".
Save your changes.
Include the Checkout Layout in your page:
The form_id parameter should be the id of your Checkout Form. If you use the Toolbox to add this code, you can lookup your form by name.
The layout parameter should refer to the folder which contains your form layout file. This file exists here:
layouts/forms/form_2/default.liquid
For now, you can use the "default" layout that is included with the eCommerce module.
If the page is visited while the user has an empty cart, an alternative "empty" layout will show. The default form layout will automatically add an empty layout at the path:
layouts/modules/module_14/checkout/default/empty.liquid
If you create a custom layout, you should also create an empty.liquid file, renaming the default folder in the filepath above with the name of your form layout.
Users will be added to the CRM in Admin.
You can see the records of transactions in Admin by navigating to the Orders list or finding the User in the CRM.
After a User has submitted your Checkout form, an order will be automatically generated. You can see a list of orders under ECOMMERCE/Orders in the left-hand menu.
Click on the name of the order for more information.
As a user buys a Product, the Inventory decreases accordingly.
A User cannot buy a Product if its Inventory is 0, but you can also hide Products that have sold out from the Product List Views.
Learn more about Product Detail pages .
Learn more about Cart Layouts
You can add a form by navigating to CMS/Forms in the left hand Menu and then clicking the "+ Add New Form" button in the top right of the page. Learn more about forms .
Learn more about pages
Remember, you will need to use the test cards from your chosen Payment Gateway. Find more information
In this article I'll explain how you can use our Media Download and eCommerce Modules to sell digital products
Prerequisites
You have installed the Module's latest version
You have installed the and
You have created Products
You have followed our document on
In this article, I'll explain how you can datasource to a Media Download Item to a Product- allowing the Product to be downloaded after it has been purchased.
To ensure that the Media Download can only be accessed after the Product has been purchased we'll output it within a User Orders Layout.
Firstly, let's create our downloadable Product, to do this we'll create a new Media Download Item, you'll need to repeat this step for every product that can be downloaded. We'll be using an image for this example, but you can use any file type that the Media Download Module supports:
Now we've added our downloadable product, let's Datasource it to the Product it is related to, we'll need to add a new Custom Field to our Products- to do this go to: eCommerce > Products > Edit Module Structure.
Then add a new field and set the type to 'Datasource (Single item)':
Finally, let's link each of our Media Download items to the Products they're associated with, to do this head to eCommerce > Products > Your product > Custom Fields. You should see a dropdown containing all the Media Download items, select the one that matches your Product:
Now we've got everything needed for our Products to be downloadable, let's output the download somewhere it can only be accessed after being purchased.
Locate the `user_orders` layout within the Secure Zone Module: Code Editor > Modules > Module_5 (Secure Zones) > user_orders.
Within this layout we'll have access to the `orders` object, containing all of the User's previous purchases, this should also contain a order_products (old) or order_products_flat (new) object (depending on your eCommerce Module version) within each order. This contains information about the Product purchased, we'll have access to the Media Download Item ID from here.
We can output the Products data like so
However, we just need the Media Download Item ID which can be outputted like so, if you have other Custom Fields you'll need to replace 'product_1' with the field name
If there are multiple Products in one Order, we'll need to create an array of the Media Download Item IDs for each Product, we'll nest another loop within the loop above over {{orders}} - here's how this would look:
So no we've assigned all of our Media Download IDs to 'media_download_id'- we'll use this within the 'item_ids' parameter on our Media Download Layout include:
Now, locate your Media Download layouts- these can be found under: Code Editor > Modules > Module_17 (Media Downloads).
From here you can either use an existing layout or copy the default layout structure to create your own (ensure you've added a 'list' folder within the folder for your layout, the 'list' folder should then contain item and wrapper layouts).
We'll only need to include the Media Download Items within the 'wrapper' file, here's how this looks:
Then within the 'item' layout, we'll add an anchor to allow the items to be downloaded- we'll also output the name of the Media Download Item as the anchor's text: <p><a href="{{this['url']}}">{{this['name']}}</a></p>


