Editing Tailwind CSS using the recommended CLI method
Before you Start
This article assumes you have completed the setup steps:
Introduction
Having set up your local Project Folder with:
A Text Editor for viewing your Folder Structure inside a Project Folder
A Siteglide-CLI environment which connects your Project Folder to a Site
An npm script which runs a Tailwind compilation process
This article will delve a little deeper into the files you can modify to take full control of your Tailwind build!
Useful Tools for this Topic
We recommend if you are using VSCode that you download and enable this extension, which will help VSCode understand Tailwind's syntax and give you tips on things like colours: bradlc.vscode-tailwindcss
src is short for source. These files are not designed to be seen by the browser. Instead think of them as the recipe for a final Tailwind CSS file.
When you sync these files, they are still pushed to your Site because they are inside the marketplace_builder folder. This allows you to share changes with other users on the Site (or yourself on different machines).
The tailwind.config.js File
This file is a configuration file and a Tailwind CSS feature which can be used to:
Create and modify Tailwind Variables e.g. Colour, Spacing
Include Plugins, for example we by default include the Flowbite plugin
This file can be used to write ordinary CSS, or you can use Tailwind's documented features. The file should not be linked to on a website, instead it will be compiled into a new production-ready CSS file when you save it and run the npm run tailwind build process.
Often with Tailwind CSS, you will find you will not need to enter this file often, as you can achieve most of the styling you want by using existing:
Utility Classes
Arbitrary Values in Utility Classes
Prefixes instead of Media Queries
However, if you do want to write your own CSS, you will not find yourself limited!
See the folder structure above to find this file. You should not need to create it or edit it manually. The npm run tailwind command will compile it automatically from the src files.
It should be linked in your Page Template, but by default a SiteBuilder Page Template will do this via a tailwind/head Liquid include. You could optionally replace this with a <link> tag instead.
When you make changes to any of the following while npm run tailwind is running in your terminal:
Your HTML (adding or removing new Tailwind classes)
Your JavaScript (adding or removing new Tailwind classes) (in case classes will be added via JavaScript, e.g. when a Flowbite Component changes state.
Your tailwind.config.js file
Your tailwind.css file
A new version of the tailwind.min.css file will be generated. Use the Siteglide CLI to sync or deploy this to your Site to see your changes applied: Reference
Tailwind uses tree-shaking so that any classes which aren't used by the files referenced above will be removed from the final CSS file to make it as fast as possible. It will also be minified.
Theme Presets are a Way to change a Theme's CSS variables, like colour and font, giving your site an interesting new look without needing to make big changes to HTML or CSS classes.
Theme Presets are a Way to change a Theme's CSS variables, like colour and font, giving your site an distinctive new look without needing to make changes to HTML or CSS classes. They should be compatible with all our existing Flowbite layouts*.
They are useful for:
Create new sites using the SiteBuilder layouts, and give them a distinctive look from step one.
Take an existing site and try it out with different Presets to help you or your client visualise different design choices with the real content.
How it Works
Our Presets use Tailwind CSS Presets and Plugins behind the scenes.
To allow you to change the currently selected preset from the SiteBuilder Settings tab, we use a small, boilerplate preset called sitebuilder_preset_settings.js. When the SiteBuilder settings are updated to select a new preset, this file is modified to point at the Preset you have selected.
Small Plugins are included within Presets in order to enable them to set global styling like fonts as well as changing variables which affect existing utility classes.
*Our first release of Theme Skins only supports Tailwind-based Themes, since we are able to leverage the powerful presets feature provided by Tailwind.
Getting Started - Coming Soon
The easiest way to get started with a Theme Preset will be to install a site from one of our Site Templates:
Existing layouts will already have the preset applied.
Newly added layouts may usually have the majority of classes applied, though to get your site looking perfect, we recommend you rebuild Tailwind reguarly.
Before going live, we also recommend you remove the "safelist" in the configuration file, for much better client-side performance.
Usage - Via SiteBuilder Settings
Open the Modules / SiteBuilder Module
Navigate to the Settings tab.
Select a Preset from the options.
Each Preset may have different versions. To get started, keep the default selected version.
Save your settings. This will save the setting and modify settings files on your site, but your Tailwind distributable CSS file will still need to be compiled using the Siteglide CLI - more on that next.
Next, go to your code editor and open a terminal window. Close any sync commands that are currently running and run a siteglide-cli pull command. This will pull down the files for each Preset in the module and the newly-updated sitebuilder_preset_settings.js file.
Do not directly modify either the sitebuilder_preset_settings.js file or other files in the modules/module_86/public folder since the module settings may overwrite your changes.
Check your Tailwind CSS config (normally at path marketplace_builder\assets\modules\module_86\src\tailwind.config.js) and your Tailwind CSS source file, normally at path: marketplace_builder\assets\modules\module_86\src\tailwind.css.
Set the presets option in your config to point at the sitebuilder_presets_settings file:
module.exports = {
  // Pointing Presets at the router file will allow the SiteBuilder module to change theme skin defaults. Anything you write in the "theme" object can override this.
  presets: [
    require('tailwindcss/../../modules/module_86/public/assets/css/presets/sitebuilder_preset_settings')
  ],
  ...
}
Variables in your config will merge with variables in the Preset. If you wish for the Preset to change specific variables, you may wish to selectively comment-out parts of your Preset which set the same variables.
CSS rules in your CSS source file may override the Preset's plugins, which might for example be setting fonts. If you wish for the Preset to set these rules, you may wish to selectively comment-out CSS rules.
The newer default config and source CSS files we provide will start with a leaner initial config than in previous SiteBuilder versions. These new versions of the files will already point to the sitebuilder_presets_settings.js and will override less variables with Flowbite defaults so these steps will not normally be necessary on a new site.
Start a siteglide-cli sync command.
Start a npm run tailwind command. A new tailwind.min.css file will be created and synced, using the new Preset and your existing CSS rules.
That's it! Any Pages which are using a Page Template which links to this new CSS file will be restyled to use this Preset's variables.
Troubleshooting
Make sure the Page you are testing with uses a Flowbite Page Template. (We will support other Themes in future, but currently Presets are only available on Themes which use Tailwind, of which Flowbite is the only one currently).
Make sure the SiteBuilder settings have either Preview Mode or CLI Mode selected. JIT mode should not be selected as this does not support Presets.
Check the Tailwind Docs for more information about how Presets handle conflicts with your own config and source CSS. You may be expecting the Site's appearance to change, but your own variables may be preventing that change.
Check that any classes you are testing are present in the layouts you are using. Tailwind CSS's tree shaking means that if an element does not have the class bg-accent-500 that class won't be included in the tailwind.min.css file even if the preset defines this colour.
Try manually then saving and syncing the tailwind.min.css file to confirm it has uploaded since making changes.
Make sure you are not directly modifying files in the modules/module_86/public folder. These can be overridden by the module, so your changes could be lost.
Modifying Default Behaviour and Disabling Features
We have designed the Presets feature to strike a balance between convenience and flexibility. To a large extent, reading the Tailwind documentation on:
And referencing the preset JS files in the modules/module_86/public/assets/presets directory will allow you to modify behaviours to suit your needs. We will just cover a few common use-cases relevant to using this feature with Siteglide.
Preventing SiteBuilder Settings from Changing Preset
Once you've experiemented with Presets and have made a decision on whether to use a specific preset, no presets or a preset from a third party, you may no longer wish to allow the SiteBuilder module's settings to change the preset. If so, you can change your configuation to stop pointing at:
...and instead point directly at your chosen Preset's file location, or set presets to an empty array [] to completely disable all presets including Tailwind's default settings or remove the presets key completely to remove presets but keep Tailwind's defaults.
Preset Versions
This allows a Preset creator to make changes without affecting your live sites, since your site can continue to safely use an older version without maintenance and updates.
We don't anticipate that it will be common practice to update a version of a Preset on a live site, but it is an option that's open to you.
If you're starting a project from the beginning, it will probably make sense to use the latest version unless you are avoiding specific known issues in the newest version.
Example Tailwind Project Setup
Example setup for Tailwind Projects. We will update this when a new version is released. The module itself will only update new sites, not existing sites when there is a breaking change.
About
We ship a folder named open_me_to_setup_tailwind_first_time to distribute our recommended template for setting up Tailwind on a new site, however, to avoid causing conflict issues, we don't update this in the Site itself when you update the module. Instead, we will add examples of our recommended configuration here.
Configuration Version Control
We recommend you update the open_me_to_setup_tailwind_first_time folder at the same time as you make changes to the configuration on your site, or use Github to track your changes. This is so other developers, or yourself on a different machine load the same configuration as you and build Tailwind in a consistent way!
Troubleshooting and Customising
Note, for this configuration to work, you may need to run npm i to install node module dependencies and siteglide-cli pull to fetch dependencies like presets.
If you already use npm on your project, do not copy the package and package-lock files and instead install the dev dependencies and scripts used in package.json manually.
Example Setup
/** @type {import('tailwindcss').Config} */

const defaultTheme = require('tailwindcss/defaultTheme');
const colors = require('tailwindcss/colors')
/* Run watch command: ```json
npx tailwindcss -c ./admin_tailwind.config.js -i ./tailwind_src/admin.css -o ./modules/module_86/private/assets/css/tailwind-admin.min.css --watch --minify
``` */

module.exports = {
  //Pointing at sitebuilder_preset_settings will apply the changes from SiteBuilder settings. If you don't want to use these preset settings, you can remove this preset, or overwrite individual settings in theme.
  presets: [
    require('tailwindcss/../../modules/module_86/public/assets/css/presets/sitebuilder_preset_settings')
  ],
  content: [
    "./marketplace_builder/**/*.{html,js,min.js,liquid}",
    "./modules/**/*.{html,js,min.js,liquid}",
    "./node_modules/flowbite/**/*.js"
  ],
  //See an example with all of the default Tailwind settings here: https://github.com/tailwindlabs/tailwindcss/blob/main/stubs/config.full.js
  //SiteBuilder presets will also extend by creating new colours: primary, secondary, accent, info, success, danger, warning.
  theme: {
    extend: {

    }
  },
  plugins: [
    require('flowbite/../../modules/module_86/public/assets/css/presets/flowbite_plugin_fork_colors_disabled'),
    require('flowbite-typography')
  ],
  darkMode: 'class',
  safelist: []
}
@tailwind base;
@tailwind components;
@tailwind utilities;

/* See https://tailwindcss.com/docs/adding-custom-styles#using-css-and-layer */

@layer base {
  /* The base layer is for things like reset rules or default styles applied to plain HTML elements.*/

}

@layer components {
  /*The components layer is for class-based styles that you want to be able to override with utilities. */

}

@layer utilities {
  /* The utilities layer is for small, single-purpose classes that should always take precedence over any other styles. */
}
{
  "name": "SiteBuilder Tailwind Template for Siteglide",
  "version": "1.0.0",
  "description": "A template for getting started using the CLI with Siteglide, SiteBuilder Module, Tailwind and the Flowbite Library.",
  "main": "tailwind.config.js",
  "scripts": {
    "tailwind": "npx tailwindcss -c ./marketplace_builder/assets/modules/module_86/src/tailwind.config.js -i ./marketplace_builder/assets/modules/module_86/src/tailwind.css -o ./marketplace_builder/assets/css/tailwind.min.css --watch --minify"
  },
  "keywords": [],
  "author": "SiteGurus",
  "devDependencies": {
    "flowbite": "^2.5.2",
    "flowbite-typography": "^1.0.3",
    "tailwindcss": "^3.4.3"
  }
}
A quick way to use Tailwind from within the Siteglide Admin
With special thanks to the folks at Beyond Code, we’ve adapted their open-source Tailwinds JIT compiler via CDN to optimise it for the Siteglide Admin and the SiteBuilder libraries. We've also added caching for better performance. Later in this article, we may abbreviate the name of this tool to "the JIT Compiler" or simply "JIT".
Quick Start
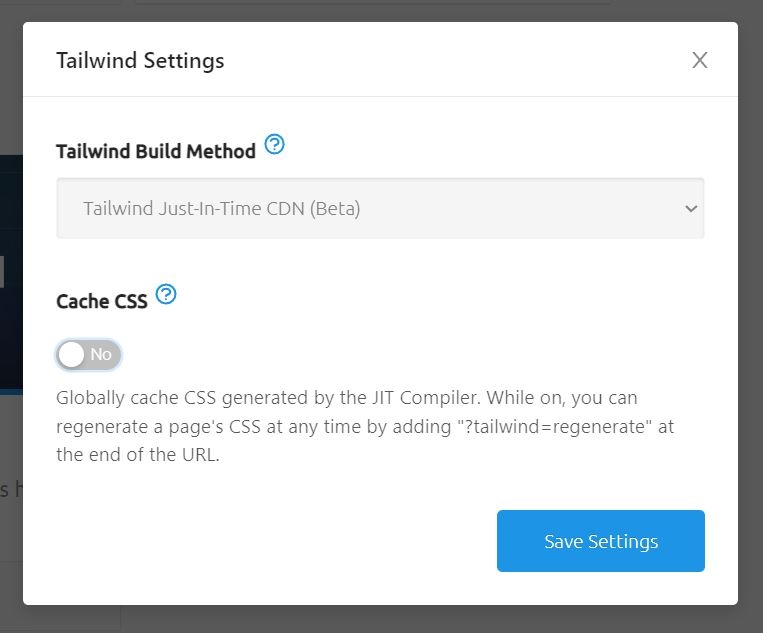
Switch to JIT Mode in SiteBuilder Tailwind Settings
Enter the Module Admin and Scroll past the libraries to the Tailwind Settings Card and click the gear icon.
Tailwind Settings
Then select “JIT”.
JIT
Create a Page Template
Create a Page Template for your Library using SiteBuilder and add it to the Pages you're working on in the Siteglide Admin.
And that's it; you're ready to start work! When your Page is loaded in the browser a new inline <style> tag will be created including all the Tailwind classes your page needs.
Next, learn more about how the JIT compiler works by reading the rest of this article, including:
Where to theme and configure your Tailwind Build
Using caching to boost performance and how to update the cache when you make changes.
How to handle classes which show conditionally e.g. on user-interaction or after JavaScript events.
How to Theme your JIT Tailwind CSS
The JIT Compiler uses a version of the Tailwind Config file that lies within <script> tags in the <head> of the page, inside the Page Template. This is because the JIT method runs in the browser and wouldn't be able to access the standard tailwind-config.js file on the root of a project.
You can edit the config file for the JIT method at the following default path in code editor: modules/module_86/layouts/tailwind/jit_tailwind_config_v4_0_0. This path can be changed in the Page Template by adding the optional_path_to_jit_config parameter to our Tailwind Liquid tag (using the platformOS format for partial paths)[https://documentation.platformos.com/developer-guide/pages/reusing-code-across-multiple-pages#step-2-include-the-partial]:
{% include 'modules/module_86/tailwind/head', optional_path_to_jit_config: 'tailwind/custom_config_file' %}
On page rendering, this will be inserted into a <script> tag in the Page Template. For older versions of SiteBuilder the config could be edited directly in the Page Template.
By default, we set up the Tailwind config file the way the library you’re using recommends in its documentation.
Since the JIT Tailwind Compiler uses Tailwind version 2.0, you can use most of the configuration options from that version of Tailwind. See here: Tailwind CSS Version 2.0 Documentation
Getting Ready for Production - Performance and Caching
Wait! My web pages are loading really slowly!
There’s another setting in the Tailwind Settings menu in SiteBuilder called Cache CSS.
Just In Time Tailwind Compilation is designed to be convenient for Developers. A developer adds new code to their site containing new Tailwind classes and those classes are instantly added to the CSS on the page. However, this convenience would normally come at a cost: the work being done by the JavaScript would slow the page down.
In production however, there is no need to rebuild the CSS on every page reload, we only need to do this after an update has been made.
Turning caching on in your Tailwind Settings menu turns on caching for Tailwind CSS across the site. The CSS is saved (base64 encoded) in your pages’ metadata once generated and when the page is loaded, the server will generate a <style> tag based on that at the top of the document.
With caching on, the page will load lightning fast. Furthermore, since we optimise the CSS for that page only, it only needs to contain the clases on that page, rather than the entire site, so could even have speed advantages against an ordinary CLI Tailwind build.
Making Changes After Turning On Caching
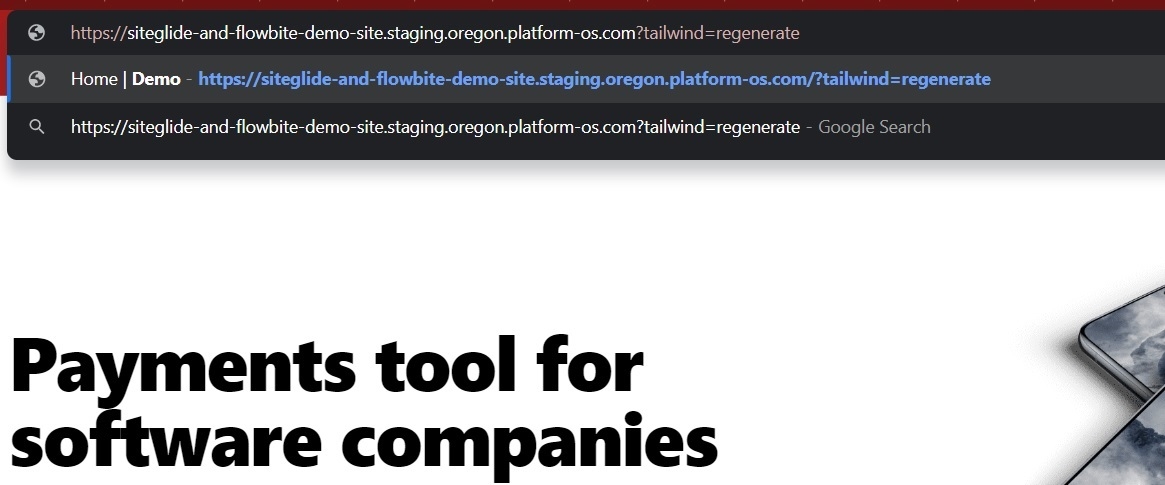
If you add new Tailwind classes to a page, you can regenerate that page’s Tailwind by adding the query parameter ?tailwind=regenerate at the end of the URL. (see URL Search Parameters for details).
After this, the page will load slowly for the developer once while this is calculated, but then the CSS against the page’s metadata will be updated and everyone else will experience the newly improved page at fast speeds.
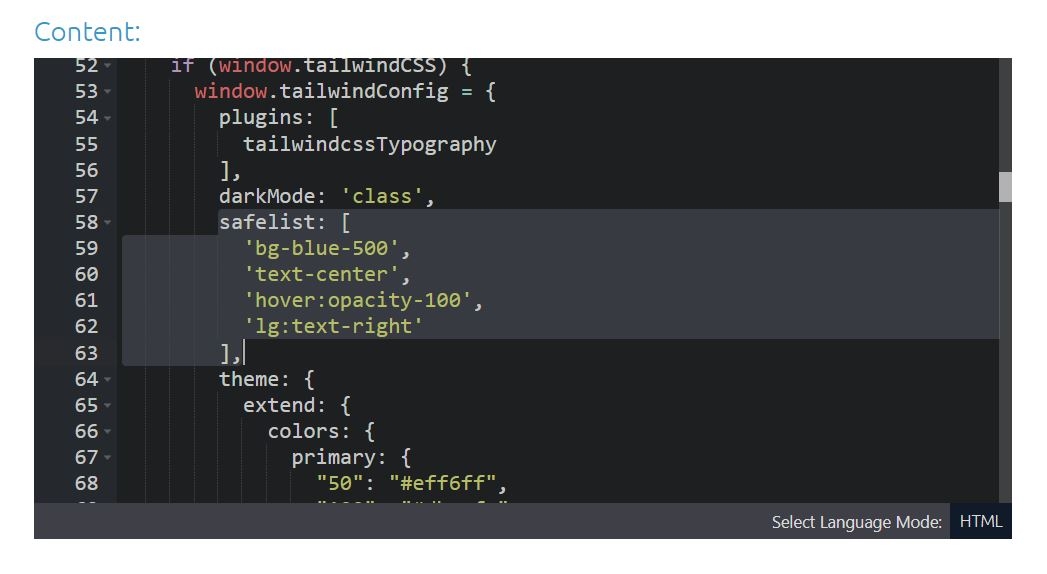
Safelisting Classes Which Are Added Via User Interaction
What if my page shows different content depending on user-interaction, or depending on the user’s session? For example a button which either shows “login” or “logout” depending on the situation?
In this case, you may find that the content which changes is missing vital CSS because the Tailwind was only generated for the initial state the components were in.
Since the CDN runs after Liquid has rendered, this includes any classes which sit inside a Liquid if statement, as well as any JavaScript or XHR requests which might add classes to the DOM after initial page load.
Another possibility, if you find that your site has a lot of user-interaction and your safelist is getting quite long, might be that your site is better suited to a Using the Tailwind CLI with Siteglide instead!
Alternatively, you may wish to consider using the JIT mode for quick development now for convenience and then switching to a CLI build when the site goes live for reliability.
Tailwind CSS Themes - Choosing a Build Method
Tailwind CSS is accelerating in popularity with its bold new approach to writing CSS for the web. You’re probably wondering how you can harness this new framework on a Siteglide site?
Tailwind’s approach to performance means it provides a huge range of utility classes, but to prevent it from slowing down your site with classes you don’t need, it builds a smaller CSS file containing just the subset of classes that you’re actually using in your project.
There are a few alternatives to consider when it comes to generating a Tailwind CSS file for your Siteglide site:
A Command Line Interface (CLI) Compilation on your machine (recommended)
Preview Mode
Just In Time (JIT) Compilation in the Browser (deprecated)
Which one is right for me?
That depends!
Both methods have their advantages, which we'll look at here, but it also depends on the preference of the developer and the type of project you're working on.
In the end, it depends on your preference and the way your clients wish to use your site.
If you use the Siteglide-CLI already to take advantage of modern code editing tools, you'll be right at home with our recommended method: Tailwind CLI.
If you, or your client, wish to build and preview your Pages in the Siteglide Admin without frequent use of the Siteglide CLI, Preview Mode may be for you. We still recommend using the Tailwind CLI now and again to set up your brand variables and to set them consistently across all of your pages at once, but this does not need to be done every time you make a change in Admin, allowing for a potentially smoother experience for clients and development.
Tailwind CSS - Preview Mode
Preview Mode is not recommended for Live Sites. We recommend only using CLI to compile Tailwind which will load the minimum CSS possible and maximise performance.
Our Preview Mode is designed to keep the convenience of Tailwind code which "just works out of the box" without the drawbacks of needing to recalculate the Tailwind CSS every time you view the Page.
Preview Mode is designed so it can be used on its own, or in combination with the recommended CLI method. See below!
Why is it needed?
Options such as the (or our now deprecated JIT method) generate CSS at runtime, so they cannot see classes which are needed for different states of Liquid logic, for example if you log in or out of a secure zone.
Page Template Level Control
In the past, we used SiteBuilder module settings to let you pick your preferred build method. Now this can also be set on the Page Template level. This allows you to, use a CLI method for faster live pages, and a Preview method for pages which are still in development.
You can set Preview Mode on a Page Template either when you create a Page Template in SiteBuilder:
Or, by editing the Page Template code:
Preview Mode On
{% include 'modules/module_86/tailwind/head', template_build_method: 'preview', optional_path_to_cli_css: 'css/tailwind.min.css' %}
CLI build only
{% include 'modules/module_86/tailwind/head', optional_path_to_cli_css: 'css/tailwind.min.css' %}
SiteBuilder automatically checks if a custom Tailwind CLI build exists. If you have one, providing a path, even to the default location, you can improve page speed, whether preview mode is on or off.
If no custom CLI build can be found and no path is provided, preview mode will be used automatically, even if CLI build is selected as a preference.
How does it work? A custom build with fallbacks
The Preview mode starts by adding two CSS files from CDNs to your Page Template's <head>:
A CSS file from the SiteBuilder Module containing Tailwind classes used by our version of the Tailwind blocks - this may differ slightly from Flowbite's as we support Liquid logic, meaning we may need to support both a login button's logged in and logged out states for example. This also supports "primary" colour variables which we use instead of "blue".
Together these CSS files create a set of fallbacks which allow Flowbite Layouts to look how Flowbite and SiteBuilder intended out of the box, should these classes not be included elsewhere. However, they won't have any of your branded variables set, like colours or fonts. The extra load time for these CSS files is also the reason why it's not generally recommended to use Preview Page for pages in Production.
To get a more consistent look and to apply your brand variables, Preview mode can also pull in a custom CLI Tailwind build underneath the other two. Where this 3rd CSS file contains the same class as one of the other 2 files, e.g. `bg-blue-700` it will overwrite it with the correct variables e.g. the correct shade of blue. Where the custom build does not yet support a class, the original Flowbite variables will be used as a fallback. Unlike a purely CLI-based approach, you don't need to spin up the CLI every time you make a change to the HTML, as you can use the fallbacks while developing and rebuild the custom CSS later, e.g. when you finish a page.
Safelist
Use Cases
Clients working in Studio
If you are building a site where you want clients to be able to build out Pages themselves using the Studio tab, you could consider creating a Page Template for them with Preview Mode enabled.
This allows clients to drag in blocks from SiteBuilder and to use them out of the box.
However, you can support them by running a CLI Tailwind build as well, either:
At the end of each day or week, to tidy up inconsistencies and add brand variables to Pages still using Preview Mode which may be missing them. Clients can continue using Preview mode but every time you rebuild the Tailwind, more and more common classes are covered by consistent variables.
When the Client finishes a Page or set of Pages and are ready to put them live and they let you know they are ready to "publish". You run a Tailwind CLI build and switch the Page Template to one with preview mode turned off, giving site visitors a faster experience. Note that by default preview mode templates are still visible to site visitors. If using this workflow, you may wish to add Liquid logic to the Page Template which either requires a visitor to be viewing in the Studio tab or to enter a `?preview=true` at the end of the URL in the browser:
Adding URL parameters to regenerate the Tailwind CSS
Safelisting
Question
Tailwind CLI
Preview Mode
JIT CDN (deprecated)
A CSS file distributed by Flowbite containing Tailwind classes to support the vast majority of their blocks and components
If you know you wish to support more classes using your brand variables in future, you can consider adding them to the in your custom CLI Tailwind Config. Just bear in mind that this can make a template which is only using the CLI CSS less efficient as it can use less tree-shaking.
Will it support CSS classes that sit inside Secure Zones or other Liquid logical statements?
✔️
✔️ So long as it uses Flowbite blocks or components.
Not yet. You can use most features from version 2.0 of Tailwind. We rely on Open Source code to provide the JIT method and it is not possible to keep it fully up to date as Tailwind brings out new versions.