Steps to Implement a Guest Checkout Flow
Pre-Requisites
You have Installed the eCommerce Module
Introduction
The Siteglide Ecommerce Module makes it easy to set up a secure and reliable Shopping Cart and Checkout flow. As usual, you can customise your layouts at every step.
In this tutorial, we will show you how to create the simplest Cart and Checkout flow- the Guest Checkout. Users can buy Products without having to sign in, but their details are stored in the CRM so the Site Owner can send them their Products.
Step 1) Set eCommerce Currency Settings
In eCommerce/Settings, select the desired default currency for your Site:

Step 2) Create Products
In eCommerce / Products, create at least one product with a price:

Check the "Pricing" tab to add a price.
Step 3) Add a Product List to a Page
Users will need to see your products in order to access their Product Detail Pages, or add to their Carts directly. You can use the following code to add a Product List view with the default layout:
SiteBuilder has an out-of-the-box Product List design ready for you in a Bootstrap 5 or Tailwind version.

Step 4) Select a Product Detail Layout
To set a Detail Layout, start at eCommerce / Products and click the "View Table" button:

Select the Detail Page Template and Layout:

SiteBuilder has an out-of-the-box Product Detail design ready for you in a Bootstrap 5 or Tailwind version.

Step 5) Implement an Add to Cart Button on Your Detail View
...and Optionally on your List View!
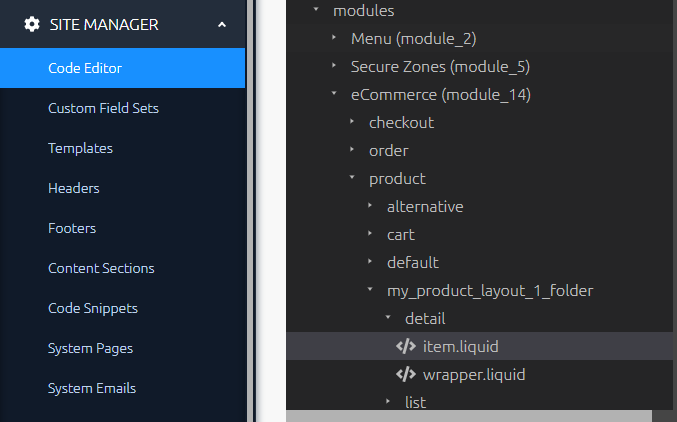
Make sure your Product Detail pages have an add to Cart Button in their layout’s item.liquid file.
Learn more about Product Detail pages here.
This liquid include tag will add the "Add to Cart" Button:
`
`
This needs to be in the item.liquid file to work, because this will have access to the correct data for this Product. To add a custom Cart Add layout, see the Folder Structure for the correct directory and use the component_layout parameter to reference it:
`
`
If adding an Add to Cart Button to a List View, make sure that the highest level component in the wrapper.liquid file has the HTML data-attribute added: data-product-list.
Step 6) Add a Cart Page
Create a new Page for your Cart and use liquid to include the Cart.
`
`
Note- the Cart does not need to be on it’s own page, but this is the easiest place to start.
If you are using SiteBuilder, or have already added your own CSS for the Cart, we recommend settingremove_default_css: 'false'
Use the layout parameter to select the folder which contains the wrapper.liquid and the item.liquid file you would like to use for your layout. For now, you can use the "cart" layout which is included in the eCommerce Module.
Learn more about Cart Layouts here
SiteBuilder has an out-of-the-box Cart design ready for you in a Bootstrap 5 or Tailwind version.

Step 7) Create a Form for your Checkout Page
This will store a paying User against the CRM and submit their payment details securely via your chosen Payment Gateway.
You can add a form by navigating to CMS/Forms in the left hand Menu and then clicking the "+ Add New Form" button in the top right of the page. Learn more about forms here: About Forms.
You will need to add the following information when creating your form:
Form Name: e.g. Checkout Form
Redirect URL - This is the relative URL you want a user to be redirected to after submission of payment details e.g. a confirmation page.
In the payments tab, toggle "Use as a payment form?" on
Payment Form Type will appear under the payments tab. Select "Standard Checkout".

Save your changes.
If you are using the PayPal Payment Gateway, you will need to carry out an additional step.
Step 8) Create a new Page for your Checkout Form
Step 9) Add the Checkout form to your Checkout Page
Include the Checkout Layout in your page - use the ID from the CMS / Forms list as the form_id parameter. If you use the Toolbox to add this code, you can lookup your form by name.
`
`
The layout parameter should refer to the folder which contains your form layout file. This file exists here:
layouts/forms/form_2/default.liquid
For now, you can use the "default" layout that is included with the eCommerce module.
SiteBuilder has an out-of-the-box Checkout Form Layout design ready for you in a Bootstrap 5 or Tailwind version.

If the page is visited while the user has an empty cart, an alternative "empty" layout will show. The default form layout will automatically add an empty layout at the path:
layouts/modules/module_14/checkout/default/empty.liquid
If you create a custom layout, you should also create an empty.liquid file, renaming the default folder in the filepath above with the name of your form layout.
Step 10) Test your eCommerce flow.
Remember, you will need to use the test cards from your chosen Payment Gateway. Find more information here
Users will be added to the CRM in Admin.
You can see the records of transactions in Admin by navigating to the Orders list or finding the User in the CRM.
Next Steps
You've now completed the simplest version of the Cart and Checkout Flow, however there are plenty of improvements you can still make and lots more to learn.
Orders
After a User has submitted your Checkout form, an order will be automatically generated. You can see a list of orders under ECOMMERCE/Orders in the left-hand menu.
Click on the name of the order for more information.
It is more difficult to give "Guest" Users access to their past orders, as you would need to verify that the order belongs to them, potentially manually by asking them to provide some information.
You can add Secure Zones to this flow in the next article, allowing you to easily show the User their past orders when logged in:
Steps to Add Secure Zones and User Orders View to your Checkout FlowA note on Inventory
As a user buys a Product, the Inventory decreases accordingly.
A User cannot buy a Product if its Inventory is 0, but you can also hide Products that have sold out from the Product List Views.
Last updated
Was this helpful?